


Block incoming faxes
Use the fax block list setting to create a list of blocked phone numbers. When a fax is received from a
blocked phone number, the fax is not printed and is immediately deleted from memory.
Create a blocked-fax list
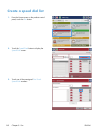
1. From the Home screen on the product control panel, scroll to and touch the Administration button.
2. Open the following menus:
●
Fax Settings
●
Fax Receive Settings
●
Blocked Fax Numbers
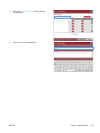
3. Touch the Fax Number to Block field to display the keyboard.
4. Type a number and then touch the OK button.
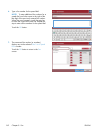
5. Touch the green arrow to move the number to the Blocked Fax Numbers list.
NOTE: To add additional blocked fax numbers, repeat steps 3 through 5.
6. Touch the Save button to save the blocked fax numbers list.
Delete numbers from the blocked-fax list
1. From the Home screen on the product control panel, scroll to and touch the Administration button.
2. Open the following menus:
●
Fax Settings
●
Fax Receive Settings
●
Blocked Fax Numbers
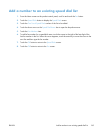
3. Touch the number to be deleted from the Blocked Fax Numbers list, touch the Delete button, and
then touch the Save button.
4. Touch the OK button to confirm the deletion of the number.
5. Repeat steps 3 and 4 to delete more numbers from the Blocked Fax Numbers list, or touch the
Delete All button, and then touch the Save button, to delete all numbers from the Blocked Fax
Numbers list at once.
156 Chapter 8 Fax ENWW