


CheXpress® CX30 User’s Manual_Rev 020309
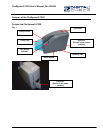
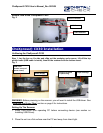
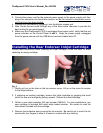
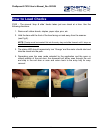
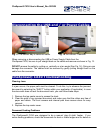
5. Insert the nozzle end of the cartridge into the cradle (Fig. 5) in the scanner and slide
forward while keeping the reservoir end of the cartridge tilted slightly upward.
6. Push the cartridge downward until it snaps into position. The cartridge should be
level to the baseplate when fully seated. Replace the top-center scanner cover.
Note: If the scanner has to be transported by common carrier from one place to another
or extended periods of inactivity, it’s advisable to remove the inkjet cartridge from the
scanner and seal in an airtight bag. If the cartridge has not been used for an extended
period of time, it may be necessary to clean the inkjet nozzles with a wet towel, and
then blot dry.
Installing the USB driver
( Use this process if instructions are not included as part of the application installation)
Windows 2000, XP & Vista - Drivers
1) Download the USB driver file from the digitalcheck.com web site and follow the
instructions.
http://www.digitalcheck.com/integration_support/drivers_and_demo_programs
2) Unzip the file and run the driver utility program to automatically install the firmware
and create a folder for the driver files (C:\Program Files\CheXpress\Drivers).
3) Attach power to the power supply to turn ON the unit. The status LED on the
scanner should now be showing ‘Red’.
4) Windows detects a new hardware device. For first time installations, you should not
have to do anything. If the wizard will not finish, go to Device Manager and select to
Update Driver for the USB device and point to (C:\Program Files\CheXpress\Drivers)
and the TSUSB2.inf file. If run a second time, select the ‘Repair’ option.
5) The USB controller will install as a TSDevice. The CX30 device will install as a
Tellerscan, once acquired by the application.
6) The LED will turn ‘Green’ when the application launches and acquires the scanner.
8