


Step 5 – Install Printheads
HP DesignJet ColorPro Series: Getting Started Guide 6
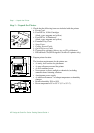
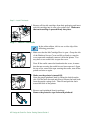
3. Remove all four ink cartridges from their packaging and insert
each ink cartridge into its own color-coded slots. Make sure
that each cartridge is pressed firmly into place.
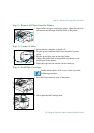
Step 5 – Install Printheads
In the online edition, click to see a video clip of the
following procedure:
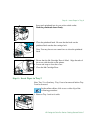
1. Make sure that the Ink Cartridge Door is open. Grasp the side
of the Printhead Access Cover and lift up firmly to snap the
cover open and completely remove it from the printer. You
may have to use some force to open the cover.
Note: If the cradle cannot be found under the cover, it means
that the tape securing the cradle has not been removed. Open
the top cover, remove the tape securing the cradle, turn off the
printer and turn on again.
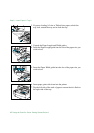
2. Make sure the printer is turned ON.
Open the purple printhead latch by lifting the latch from the
rear. Pull the latch forward and down to release the latch hook
from the purple carriage lock. Then lift and push the latch
toward the back of the printer.
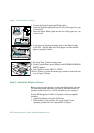
3. Remove each printhead from its package.
Remove the protective tape from each printhead.