


3-12 Screen Presentation Copyright © 2000 Hewlett-Packard Co.
Ski IA-64 Simulator Reference Manual 1.0L
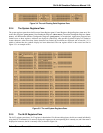
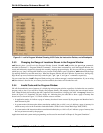
3.6.2 Invalid Code and the Data Window
If you tell Ski to display non-existent memory, Ski will display x’s instead, as shown in Figure 3-14. Non-existent mem-
ory is defined for the Data Window similarly to its definition for the Program Window, described in Section 3.5.4, “Invalid
Code and the Program Window”, except that the relevant bit for system-mode programs is psr.dt.
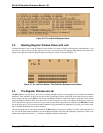
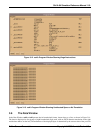
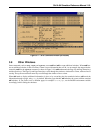
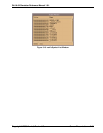
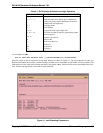
3.7 The Command/Main Window
xski
and
ski
are command-driven simulators. Most of your interaction with them is done by typing commands. Your
commands are typed in a window titled “main” in
xski
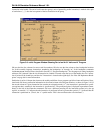
(see Figure 3-16) and “Command” in
ski
(see Figure 3-17).
3.7.1 The
xski
Main Window
xski
divides the Main Window into five areas:
• Menus: File, View, Configure, and Help. The File menu provides a “Quit” selection for you to exit the program. The
View menu lets you choose which windows to see. The Configure menu is currently non-functional. The Help menu
provides a “Commands” selection that displays the commands Ski recognizes and a “Product Information” selection
that displays information about
xski
.
• Buttons:
Step
,
Run
,
Prog
,
Data
,
Regs
,
Cache
,
TLB
, and
Quit
. Clicking on the
Step
button executes the command
“step 1”, single-stepping the simulated program. Shift-clicking the button executes the command “step 10”, step-
ping the simulated program through ten instructions. The
Run
,
Prog
,
Data
, and
TLB
buttons execute the run, pj, dj,
and sdt commands respectively. If the Program Window has been closed (removed from the screen, not merely min-
imized to an icon), the
Prog
button recreates it. The
Data
button operates similarly with respect to the Data Window.
The
Regs
and
Cache
buttons are currently non-functional.
xski
’s buttons are configurable. Using the X Window System resource mechanism, you can change the number of
buttons, the button labels, and the commands the buttons emit. The easiest way to do this is to edit the XSki file,
described in Section 2.5.2, “The XSki File”. Much of
xski
’s user interface behavior is controlled by this file but you
should be careful in making changes to any elements other than button descriptions;
xski
may change in the future in
ways that are not backwards-compatible with changes you make.
• Command History: commands you’ve already entered.
• Command: where you type commands to
xski
.
• Responses: responses and error messages from
xski
.
The Menu, Button, and Command History areas provide shortcuts for typing commands. The
Step
button is particularly
useful: when you are single-stepping through a program, you can click on the
Step
button instead of repeatedly typing the
“step” command. The Command History area provides another way to avoid typing: you can double-click on a command
in the Command History to run the command again, or single-click on the command to move it to the Command area
where you can edit and then re-run it. The Command area is where you type commands to the simulator, but, as mentioned
above, you can use the menus, buttons, and Command History as shortcuts. Two useful commands to know are “help”,
which causes a window listing all the commands to be displayed, and “help command” which causes information about
the command to be shown in the Responses area. The Responses area is also used by the simulator to give you feedback
when it can’t execute one of your commands.
xski
understands the Prev and Next keys and the arrow keys found on many HP keyboards. When the Main Window has
the X Window System focus, the current area is highlighted, usually with a bright outline. You can make a different area
current with Tab and Shift-tab. The Prev, Next, up-arrow, and down-arrow keys scroll through the current area, allowing
you to easily edit and re-run previous commands from the Command History and review previous messages in the
Response area. In addition, you can use the Alternate key (“alt”) like a Shift key, along with the underlined letter in each
menu name as a shortcut to access the menu, rather than using the mouse. For example, Alt+F brings up the File menu.
This lets you spend less time shuttling between the keyboard and mouse, and more time doing productive work.