


24 Using the Photo Viewer
Browsing Pictures
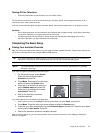
This feature allows you to view and search through all the photos on your memory card.
1. On the remote control, press Menu. Use the left and right arrow buttons to select Browse, then press OK.
2. The photos are then displayed as thumbnails. To view a photo full-screen, use the left and right arrow buttons
to highlight the photo, then press OK. To return to thumbnail view, press OK.
Tagging and Untagging Pictures
Tagging pictures allows you to mark specific photos for viewing in a slideshow.
1. On the remote control, press Menu. Use the left and right arrow buttons to select Browse, then press OK.
2. To tag a photo:
• Use the left and right arrow buttons to select a photo, then press the green button. Tagged photos are
marked with a check at the bottom.
To untag a photo:
• Highlight the photo and press the green button. To untag all photos, press the yellow button.
Viewing a Slideshow
A slideshow is a sequential, full-screen view of all your pictures. The photos automatically advance at specified time
intervals.
1. Press Menu. Use the left and right arrow buttons to select Slideshow, then press OK.
2. If no photos are tagged, the slideshow begins. If some photos are tagged, use the up and down arrow buttons
to select whether to view all photos or just the tagged photos, then press OK.
NOTE:
• You can rotate a picture by pressing the red button.
• You can use Ch+ and Ch- to page through the thumbnails.
• As you browse through your pictures, you can tag specific pictures for printing or viewing in a slideshow.
For more information, refer to “Tagging and Untagging Pictures” on page 24.
NOTE:
• To manually go forward or backwards in the slideshow, press the left and right arrow buttons.
• To pause a slideshow, press OK or Info.
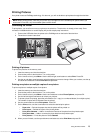
• To queue photos for printing during a slideshow, press OK or Info to pause the slideshow. Then, do one of
the following:
• To print one copy of the photo, press the yellow button.
• To print more than one copy of a photo, use the number pad to specify the number of copies to print.
The number of copies will be indicated near the picture. When you are finished, press OK or Info to return
to the slideshow.
• To adjust the time delay on the slideshow or have the slideshow automatically repeat, refer to “Adjusting
Photo Viewer Settings” on page 26.
Downloaded from www.Manualslib.com manuals search engine