


Preparing the Cradle for Use
Note: Keep dirt and foreign objects out of the cradle. Do not short circuit any of the charging terminals (pins), as this action
could result in injury or property damage.
Honeywell recommends a stable, horizontal surface out of the way of:
l inclement weather conditions,
l extremely high concentrations of dust or wind blown debris,
l accidental knocks, bumps or other shocks to the cradle and items in the cradle bays.
l Leave enough space at cable connectors to ensure cables are protected from jostling, tugging or being disconnected by
passing objects.
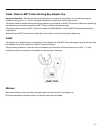
Note: The MX7 Tecton must have a main battery installed when it is docked in a cradle.
The main battery in the MX7 Tecton is recharged when the MX7 Tecton is docked in a powered desktop cradle and when it is
docked in a powered vehicle cradle.
Quick Start - Desktop Cradle
The following list outlines, in a general way, the process to follow when preparing the MX7 Tecton desktop cradle for use.
Refer to the following sections in this document for more details.
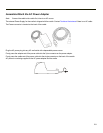
1. Refer to Install / Remove Desktop Cradle Adapter Cup.
2. Connect the cradle end of the power adapter cable to the Power port on the back of the cradle.
3. Attach the AC power connector to a dependable power source.
4. Attach any desired external cabled devices to the ports on the cradle.
5. The desktop cradle is ready for use.
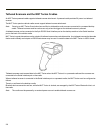
Battery Charging in a Desktop Cradle
The MX7 Tecton main battery recharging is managed by the Power Management settings in the MX7 Tecton.
Refer to Start > Settings > Control Panel > Power on the MX7 Tecton.
The spare battery in the spare battery well re-charges with or without an MX7 Tecton in the dock. The spare battery is fully
charged in approximately four hours.
The cradle must be receiving power from an external power source before the main battery in the docked MX7 Tecton or spare
battery pack charging can take place.
2-2