


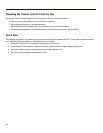


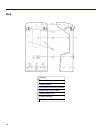


Overview
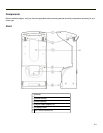
Vehicle mounted cradles and brackets are specifically designed for vehicle mount applications. The vehicle mounted assembly
restrains the MX7 Tecton and isolates it from shock and vibration.
Overhead, dash and roof support pillar mounting is via a RAM Mount accessory which includes all the hardware and squeeze
plates required for vehicle mounting. Multiple attachment points for the RAM ball mechanism are located on the vehicle cradle.
In most cases, disconnect any power and peripheral cables from the MX7 Tecton before it is secured in the vehicle mounted
assembly.
Never put the MX7 Tecton into the vehicle mounted assembly until the assembly is securely fastened to the vehicle.
The MX7 Tecton must have a main battery installed when it is docked in a vehicle mounted cradle.
The main battery in the MX7 Tecton is recharged when the MX7 Tecton is docked in a powered vehicle cradle.
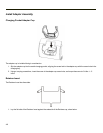
Preparing the Powered Vehicle Mounted Cradle for Use
The powered vehicle mounted assembly should be secured to an area in the vehicle where it:
l Does not obstruct the driver's vision or safe vehicle operation.
l Will be protected from rain or inclement weather.
l Will be protected from extremely high concentrations of dust or wind-blown debris.
l Can be easily accessed by a user seated in the driver's seat while the vehicle is not in operation.
l There must be enough clearance at the back of the cradle to accept an MX7 Tecton with a trigger handle.
l There must be at least 2” clearance at the back of the vehicle cradle for power, serial interface and the MX7 Tecton
Input/Output cables.
Quick Start
The following list outlines, in a general way, the process to follow when preparing the MX7 Tecton powered vehicle mounted
cradle for use. Refer to the following sections in this document for more details.
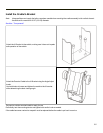
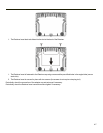
1. Attach the vehicle mounting assembly to the vehicle.
2. Attach the cradle assembly to the vehicle mounting assembly.
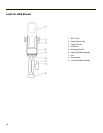
3. Secure the MX7 Tecton in the mounted vehicle cradle.
4. Adjust the MX7 Tecton to the best viewing angle.
5. Connect peripheral cables.
6. Secure the DC/DC or 12 VDC power connector from the vehicle mounted power supply to the Power port.
7. Secure all cables in strain relief cable clamps.
The MX7 Tecton in the powered vehicle mounted assembly is ready for use.
4-2