


43 Chapter 4 Award BIOS Setup
3. At the “Confirm Password” prompt, retype the desired password,
then press <Enter>.
4. Select Save to CMOS and EXIT, type <Y>, then <Enter>.
To Change Password
1. Choose the Set Password option from the CMOS Setup Utility
main menu and press <Enter>.
2. When you see “Enter Password,” enter the existing password and
press <Enter>.
3. You will see “Confirm Password.” Type it again, and press
<Enter>.
4. Select Set Password again, and at the “Enter Password” prompt,
enter the new password and press <Enter>.
5. At the “Confirm Password” prompt, retype the new password, and
press <Enter>.
6. Select Save to CMOS and EXIT, type <Y>, then <Enter>.
To Disable Password
1. Choose the Set Password option from the CMOS Setup Utility
main menu and press <Enter>.
2. When you see “Enter Password,” enter the existing password and
press <Enter>.
3. You will see “Confirm Password.” Type it again, and press
<Enter>.
4. Select Set Password again, and at the “Enter Password” prompt,
don’t enter anything; just press <Enter>.
5. At the “Confirm Password” prompt, again don’t type in anything;
just press <Enter>.
6. Select Save to CMOS and EXIT, type <Y>, then <Enter>.
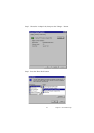
4.2.12 Save & Exit Setup
If you select this option and press <Y> then <Enter>, the values entered
in the setup utilities will be recorded in the chipset’s CMOS memory. The
microprocessor will check this every time you turn your system on and
use the settings to configure the system. This record is required for the
system to operate.