


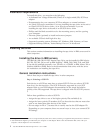
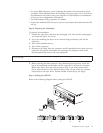


1SCSI connector
2SCSI ID connector
3Power connector
Note:
1. When setting the SCSI ID, use the jumpers that come with the tape drive.
2. If your enclosure uses a remote SCSI ID switch, remove the jumpers from the jumper pins on the tape drive and
connect the remote switch.
1. Set the SCSI ID.
a. Locate the SCSI ID connector 2.
b. Decide on the SCSI ID number you want before you attach the SCSI bus
cable to the host. Make sure that the ID number you want is not already
being used by another device.
c. Find the jumper pin setting that corresponds to the SCSI ID number you
choose; then place jumper pins on the SCSI ID blocks as shown. You can
use a pair of flat-nose pliers to place the jumpers on the jumper pins.
2. Terminate the SCSI bus by adding the appropriate (LVD or SE) terminator to
the last connector on the SCSI bus.
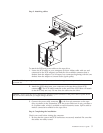
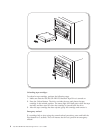
Step 4. Mounting the drive
Mount the tape drive; then attach the SCSI and power cables to it. If there is
insufficient working space to attach the connectors after mounting the drive, attach
the cables first. To mount the drive, follow these steps:
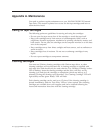
1. Locate an available 5.25-inch bay or space in your computer to mount the tape
drive. Remove the cover plate from the bay selected. Place the drive
horizontally or vertically.
2. Attach mounting hardware to drive (if applicable).
3. Align the drive-bay screw holes with the threaded holes in the drive housing.
When you mount the tape drive, follow these guidelines:
v Ensure that no objects such as screw heads, cables, or adjacent devices are
pressing against the frame.
v Ensure that nothing blocks the ventilation slots on the bottom and rear of the
tape drive.
Attention: Use only the screws that come with the tape drive. Other screws
might be too long and can cause damage to the drive.
4. Insert a screw through each of the drive-bay holes into the threaded holes in
the drive and tighten the screws with a screwdriver.
4 100/200 GB HH LTO Internal Tape Drive: User’s Guide