


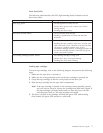


Front Panel LEDs
The following table describes the LED (light emitting diode) indicators on the
drive front panel.
Indicator activity Meaning
Ready (top, green)
v On: the tape drive is ready for use
v Off: the drive power is off or there was a failure
during self-test
v Flashing: the drive is busy
Drive Error (second, amber)
v Off: no fault has been detected
v Flashing: a problem has occurred with the drive
hardware
Tape Error (third, amber)
v Off: no fault has been detected
v Flashing: the tape currently in the drive is faulty. This
LED could come on for a number of reasons, but they
all relate to a problem with the tape, such as
unreadable cartridge memory or unsupported tape. Do
not use the cartridge; replace it. The LED will go out
when a tape load is started.
Use Cleaning Cartridge (bottom, amber)
v On: cleaning cartridge is being used
v Off: the drive does not require cleaning
v Flashing: the drive needs cleaning
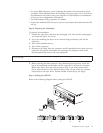
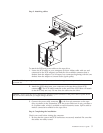
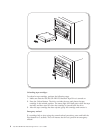
Loading tape cartridges
To load a tape cartridge, refer to the following diagram, and perform the following
steps:
1. Make sure the tape drive is turned on.
2. Make sure the write-protection switch on the tape cartridge is properly set.
3. Grasp the tape cartridge so that the write-protect switch faces you.
4. Slide the tape cartridge into the tape load compartment.
Note: If the tape cartridge is already in the unload position (partially ejected)
and you want to reload it, remove the cartridge and then load it again. If
the tape cartridge is already loaded and you turn the power off, then
turn the power back on. The tape cartridge will reload.
5. The drive will pull in the cartridge and flash the green LED while loading.
Once loaded, the green LED returns to a solid state.
Installation and user’s guide 7