


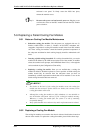
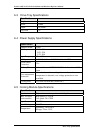

Chapter 5: System Maintenance
5.7.2 Replacing a Failed Hard Drive
To replace a hard drive, please follow these steps:
WARNING!
Hard drives are fragile. Please always handle hard drives with extreme care. Do
not drop the hard drives; always be slow, gentle and careful when handling a hard
drive. Only handle the hard drives by the edges, avoid touching any components
or connector pins.
Step 1. Identify the drive tray that contains the hard drive that needs to be
replaced.
WARNING!
Replacing the wrong drive in an array can fatally fail a RAID configuration. You
should identify a failed drive from the RAIDWatch GUI screen, by checking the
drive slot ID in the terminal screen, by checking the LEDs on the drive tray panel,
and/or use the identify/flash drive function in firmware. Please refer to Section 1.5
in your Generic Operation Manual for details on this function.
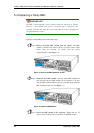
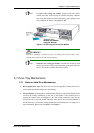
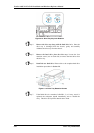
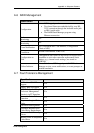
Step 2. Open the front flap: Once the drive tray has been identified, push
the release button at the drive bezel. (See Figure 5-12) The front
bezel will automatically be lifted and the drive tray should be easily
dislodged from the chassis.
Figure 5-12: Front View of an Individual Drive Tray
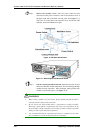
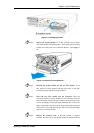
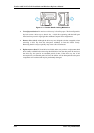
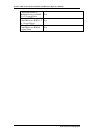
Step 3. Remove the drive tray. To remove the drive tray from the
enclosure, the key-lock must be unlocked. (See Figure 5-13) To do
this, turn the key-lock on the front of the drive tray until the groove
on its face is in a horizontal orientation.
Drive Tray Maintenance
5-15