


Ensure that you have the following parts and tools available:
•
An antistatic bag or an antistatic mat
•
Needlenose pliers
•
Rubber safety caps to cover the transceiver and fiber-optic cable connector
•
A dust cover to cover the port
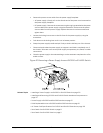
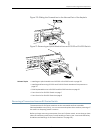
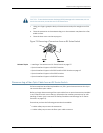
Figure 72 on page 181 shows how to remove an SFP transceiver.The procedure is the
same for all transceiver types.
To remove a transceiver from an EX Series switch:
1. Place the antistatic bag or antistatic mat on a flat, stable surface.
2. Label the cable connected to the transceiver so that you can reconnect it correctly.
WARNING: Do not look directly into a fiber-optic transceiver or into the ends of
fiber-optic cables. Fiber-optic transceivers and fiber-optic cables connected to
transceiversemit laser light that can damage your eyes.
WARNING: Do not leave a fiber-optic transceiver uncoveredexcept when inserting or
removing a cable. The rubber safety cap keeps the port clean and prevents accidental
exposure to laser light.
CAUTION: Do not bend fiber-optic cables beyond their minimum bend radius. An arc
smallerthana fewinches indiametercan damage the cablesand causeproblemsthat
are difficult to diagnose.
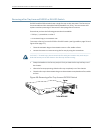
3. Remove the cable connected to the transceiver (see “Disconnecting a Fiber-Optic
Cable from an EX Series Switch” on page 181). Cover the transceiver and the end of
each fiber-optic cable connector with a rubber safety cap immediately after
disconnecting the fiber-optic cables.
4. Using your fingers, pull the ejector lever on the transceiver to unlock the transceiver.
CAUTION: Before removing the transceiver, make sure you open the ejector lever
completely until you hear it click. This prevents damage to the transceiver.
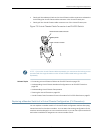
5. Using the needlenose pliers, pull the ejector lever out from the transceiver.
6. Grasp the transceiver ejector lever and gently slide the transceiver approximately
0.5 in. (1.3 cm) straight out of the port.
Copyright ©2010,Juniper Networks,Inc.180
CompleteHardwareGuide forEX3200 andEX4200 EthernetSwitches