39
Caution
5.11 Wechsel Druckkopfkabel
Netzstecker ziehen!
Erden Sie sich vor dem Entfernen
oder dem Einbau des Druckkopfes
am Gehäuse. Dadurch wird der
Druckkopf vor einer statischen
Entladung Ihres Körpers über den
Druckkopf zur Erde geschützt.
1. Deckel öffnen.
2. Gehäuse abschrauben (2 Schrauben innen, 2 außen).
3. Druckkopf (5) hochklappen, Etiketten und Transfer-
band aus dem Drucker entnehmen.
4. Druckkopf herunterklappen.
5. Feststellschraube (3) für Druckkopf vollständig
lösen.
6. Stecker (Bild 23, 6) des Druckkopfkabels von der
Leiterplatte abziehen, Kabelhalter (Bild 23, 7) öffnen
und Druckkopfkabel (Bild 23, 2) aus dem Leitungs-
halter (Bild 23, 8) ziehen.
7. Druckkopf (5) vorsichtig nach vorn herausziehen, bis
Buchsenleiste (4) zugänglich wird.
8. Buchsenleiste (4) und Stecker am Druckkopf zu-
nächst an der Unterseite vorsichtig mit einem Schrau-
bendreher wechselseitig auseinanderhebeln, bis die
Buchsenleiste an der Oberseite vollständig ab-
gehebelt werden kann.
9. Druckkopfkabel (2) vorsichtig zur Leiterplattenseite
durch die Öffnung (1) schieben.
10. Neues Druckkopfkabel durch Öffnung (1) schieben.
11. Buchsenleiste (4) an den Druckkopf anschließen.
12. Druckkopf vorsichtig in Halterung zurückschieben.
13. Druckkopf-Feststellschraube (3) mit Hand leicht
anziehen!
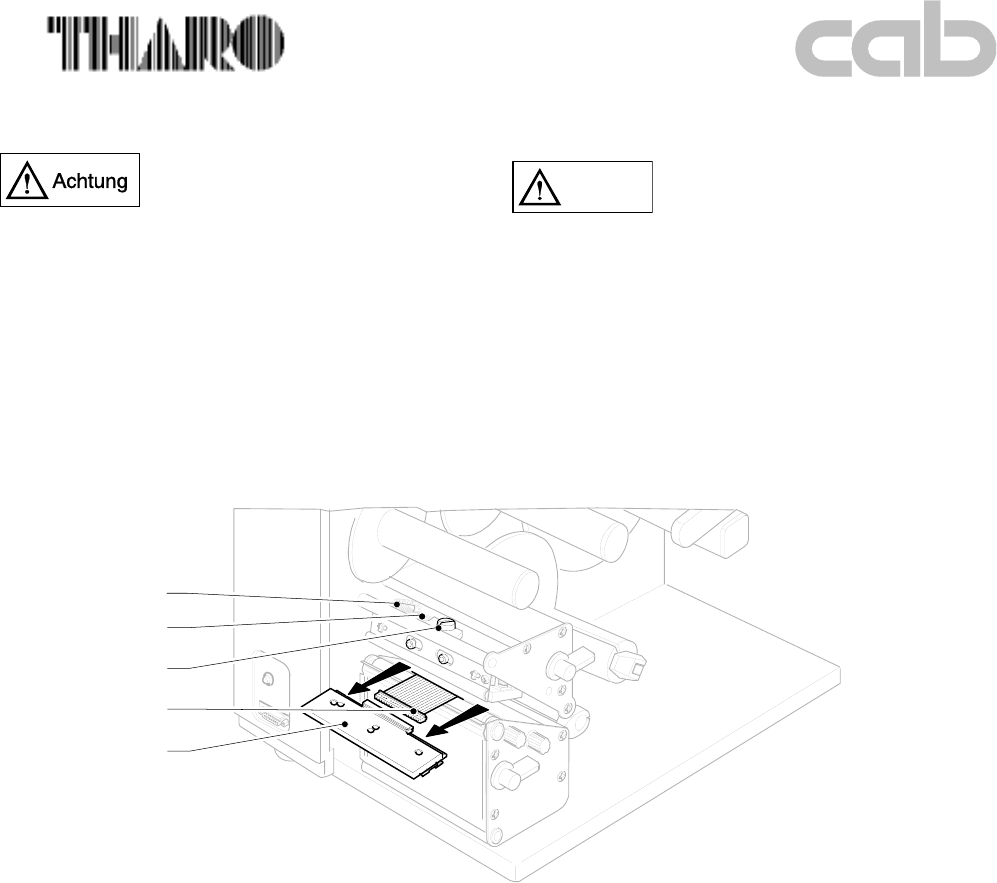
Bild 22 1 Öffnung im Montageblech
2 Druckkopfkabel
3 Feststellschraube für Druckkopf
4 Buchsenleiste des Druckkopfkabels
5 Druckkopf
1
2
3
4
5
5.11 Replacing the Printhead Cable
Unplug the power cable!
Ground yourself to the chassis before
you remove or install the printhead.
This will prevent a static discharge
from your body through the printhead
to ground.
1. Open the cover.
2. Remove the chassis by loosening the screws (2 screws
inside, 2 outside).
3. Open the printhead (5) and remove all label stock and
transfer ribbon from the printer.
4. Close the printhead.
5. Loosen the printhead locking screw (3) completely.
6. Remove the printhead cable connector (Fig. 23;6) from
the PCB. Open the flat cable holder (Fig. 23;7). Pull the
cable (Fig. 23;2) off the second cable holder (Fig. 23;8).
7. Carefully pull the printhead (5) out of the front of the
printer until the cable connector (4) becomes
accessible.
8. Loosen the printhead cable connector (4) carefully
from the plug of the printhead. Use a screwdriver
below the head alternately on the left and the right
until the cable connector can be pulled off from the
top.
9. Carefully remove the printhead cable (2) through the
opening (1) against the side of the PCB.
10. Push the new printhead cable through the opening (1).
11. Plug the cable connector (4) in the connector of the
printhead.
12. Slide the printhead carefully back into the mount.
13. Tighten printhead locking screw (3) slightly by hand.
Figure 22 1 Printhead cable
2 Opening in mounting plate
3 Printhead locking screw
4 Printhead cable connector
5 Thermal printhead


