


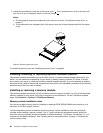
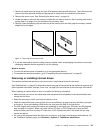
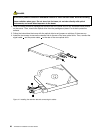

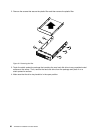

7. Remove the optical drive retention tab by removing the two screws that secure the tab. Save the
retention tab to use when you install a new optical drive.
Figure 13. Removing the optical drive retention tab
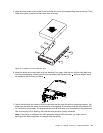
8. If you are instructed to return the removed optical drive, follow all packaging instructions and use any
packaging materials that are supplied to you for shipping.
What to do next:
• To work with another piece of hardware, go to the appropriate section.
• To complete the removal procedure, go to “Completing the parts replacement” on page 64.
Installing the optical drive
Attention: Do not open your server or attempt any repair before reading and understanding the “Safety information”
on page iii and “Guidelines” on page 17.
This section provides instructions on how to install the optical drive.
To install the optical drive, do the following:
1. If you are replacing the optical drive, make sure that:
• You have all the cables and other equipment that is specied in the documentation that comes
with the new optical drive.
• You have checked the instructions that come with the new optical drive to determine whether you
must set any switches or jumpers in the drive.
• You have removed the retention tab from the rear of the old optical drive and have it available for
installation on the new optical drive.
Note: If you are installing a drive that contains a laser, observe the following safety precautions.
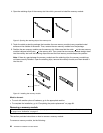
Statement 3
CAUTION:
When laser products (such as CD-ROMs, DVD drives, ber optic devices, or transmitters) are
installed, note the following:
• Do not remove the covers. Removing the covers of the laser product could result in exposure
to hazardous laser radiation. There are no serviceable parts inside the device.
• Use of controls or adjustments or performance of procedures other than those specied herein
might result in hazardous radiation exposure.
Chapter 5. Installing, removing, or replacing hardware 25