


Setting up the address book
1 Type the printer IP address into the address field of your Web browser.
Note: If you do not know the IP address of the printer, then print a network setup page and locate the address
in the TCP/IP section.
2 Click Settings.
3 Click E-mail/FTP Settings.
4 Click Manage E-mail Shortcuts.
5 Change the e-mail settings as needed.
6 Click Submit.
Creating an e-mail shortcut using the Embedded
Web Server
1 Type the printer IP address into the address field of your Web browser.
Note: If you do not know the IP address of the printer, then print a network setup page and locate the address
in the TCP/IP section.
2 Click Settings.
3 Click Manage Destinations.
Note: You may be asked to enter a password. If you do not have an ID and password, get one from your system
support person.
4 Click E-mail Destination Setup.
5 Type a unique name for the recipient, and then enter the e-mail address.
Note: If you are entering multiple addresses, separate each address with a comma (,).
6 Select the scan settings (Format, Content, Color, and Resolution).
7 Enter a shortcut number, and then click Add.
If you enter a number that is already in use, you are prompted to select another number.
E-mailing a document
Sending an e-mail using the keypad
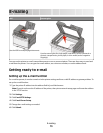
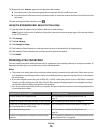
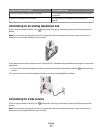
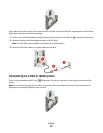
1 Load an original document faceup, short edge first into the ADF or facedown on the scanner glass.
Note: Do not load postcards, photos, small items, transparencies, photo paper, or thin media (such as magazine
clippings) into the ADF. Place these items on the scanner glass.
2 If you are loading a document into the ADF, then adjust the paper guides.
E-mailing
71