


Diagnostic Information 2-14
4040 Finisher
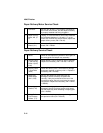
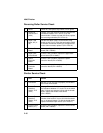
Power Service Check
Be sure the correct voltage is available at the power outlet, and the
power plug is firmly plugged into the printer, paper deck, and fin-
isher.
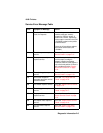
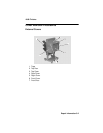
2 Staple Tray
Paper Sensor,
PI-4, (5-1)
Check the voltage of J9-3 on the finisher driver
board. There should be 0 V when the sensor is
activated (PN 11D0071).
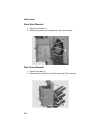
3FinisherDriver
Board (13-1)
If there is still a problem, replace the finisher driver
board (PN 11D0294).
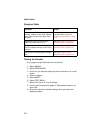
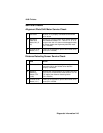
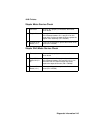
FRU Action
1 Interface
Connector
Be sure the interface cable (PN 11D0305)
connector is properly connected.
2 • Option Con-
troller Board
• Printer Con-
troller Board
Turn the printer on. Measure the voltage between
J4-7 (PWRON-IN) and J4-11 (GND) on the finisher
board. If it does not measure approximately 5 V,
replace the option controller board (PN 11D0326).
If this does not fix the problem, replace the printer
controller board.
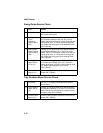
3 Fuse Remove the power supply and replace the fuse
(PN 11D0343) if necessary.
4 Power Supply
(3-1)
Turn the printer off and remove the finisher power
cord. Be sure J1 is plugged into the finisher driver
board. Plug the power cord into the finisher power
supply and turn the printer on. Measure the DC
power supply through connector J1. Be careful not
to short it. If the voltage on J1-1 is not
approximately 5 V, and the voltage on J1-2, -4 does
not measure approximately +24 V, replace the
power supply (PN 11D0076).
5FinisherDriver
Board (13-1)
Turn off the printer and check the lines and DC
loads from J1 on the finisher driver board. There
should be 0 V on J1-1 or J1-2, -4. If there is voltage,
replace the finisher driver board (PN 11D0294).