


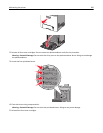


Resetting the maintenance counter
Reset the maintenance counter after installing a new photoconductor.
When a “replace” or “low” message appears
Follow this procedure when a photoconductor is replaced and 84 Replace [color] photoconductor, 84
[Color] photoconductor nearly low, or 84 [Color] photoconductor low appears:
1 From the printer control panel, navigate to:
> Status/Supplies > > Supply Replaced >
or
> Status/Supplies > Supply Replaced
2 When Replaced [color] photoconductor appears, select Yes. For non‑touch‑screen printer models,
press
to confirm.
Notes:
• Make sure to replace all four photoconductors at the same time.
• When Ready appears, the counter is reset.
When a “replace” or “low” message does not appear
Follow this procedure when a photoconductor is replaced and a “replace” or “low” message does not appear:
1 From the printer control panel, navigate to:
> Settings > > Supplies Menu > > Replace Supply >
or
> Supplies Menu > Replace Supply
2 Select the button that indicates the supply item you replaced.
• All
• Cyan Photoconductor
• Magenta Photoconductor
• Yellow Photoconductor
• Black Photoconductor
3 When [Color] photoconductor replaced appears, select Yes. For non‑touch screen printer models,
press
to confirm.
4 Press to return to the home screen.
Maintaining the printer 198