


Repair Information 4-4
4078-00X
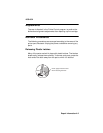
Carrier Frame Assembly Removal
The carrier rail mounted by two screws on the carrier frame is included with
the carrier frame (11A5436). The carrier rail, which is not available as a
FRU, is mounted in the elongated slots at the factory. During adjustment, the
rail is pushed to the rear as far as it will go, before the mounting screws are
tightened.
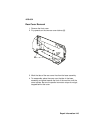
1. Remove the front cover.
2. Remove the rear cover.
3. Remove the sheet feeder.
4. Disconnect the power supply connector at the system board.
5. Remove the two screws that secure the carrier frame to the
base assembly.
6. Remove the screw that secures the power supply frame to the
carrier frame.
7. Remove the ground strap screw from the system board.
8. Unlatch the carrier frame from the base assembly and lift it off
the base.
9. Slide the carrier frame assembly off the base assembly.
10. To replace the carrier frame, remove all associated parts from
the old carrier frame and install them on the new carrier frame.
Carrier Home Sensor Removal
1. Remove the front cover.
2. Remove the rear cover.
3. Disconnect the sensor cable from the system board.
4. Remove the screw that secures the sensor to the carrier frame.
5. Remove the sensor.