Lightwave Communications USB SERVERSWITCH
www.lightwavecom.com Page 13 of 25
3.2.1 System Setup: Port Setup
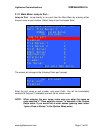
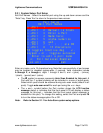
Edit Port Names - Select the desired port using the up and down arrows and the
“Enter” key. Press 'Esc' to return to the previous menu screen.
Port Setup
Edit Port Names
+Port 1
+Port 2 Default is blank
+Port 3 Enter a Port
+Port 4 Name here;
+Port 5 alpha-numerics
+Port 6 and
-Port 7 + - / . ; are OK
+Port 8 15 characters
F8 toggles Inactive msg +/-
keypad + or - toggles autoscan
Enter to edit a port name
; Port Autoscan Enabled
Prev unit Down
Enter any name, up to 15 characters long. Note that case-sensitivity of port names
may be enabled or disabled system-wide, if required. Valid characters include
A through Z, a through z, digits 1 through 9 and 0, and + (plus), - (minus),
/ (slash), . (period) and : (colon).
• The
symbol on-screen represents Auto Scan Enabled for this port. A
Port with the symbol showing will be included in a scan of active ports.
Select which ports should be scanned during auto scan mode (default is all
ports). Toggle auto scan on/off for each port using the + or - keys.
• The + and - symbol before the Port number shows the LCD Inactive
message status (+ indicates that the front panel LCD will display a status
message for this port, - indicates that the front panel status message is
disabled for this port). To change this setting, select the Port and press F8
to turn the status message option On or Off.
Note: Refer to Section 3.1.1 for Auto-Scan system setup options.


