


Wireless-G Access Point with SRX
List of Figures
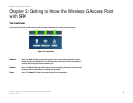
Figure 3-1: Front Panel 6
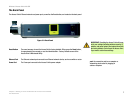
Figure 3-2: Back Panel 7
Figure 4-1: Connect the Ethernet Network Cable 8
Figure 4-2: Connect the Power 8
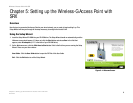
Figure 5-1: Welcome Screen 9
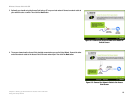
Figure 5-2: Connect the Network Cable to the Router or Switch Screen 10
Figure 5-3: Connect the Network Cable to the Access Point Screen 10
Figure 5-4: Power on the Access Point Screen 11
Figure 5-5: Check the Access Point’s Status Screen 11
Figure 5-6: Select the Access Point Screen 12
Figure 5-7: Password Screen 12
Figure 5-8: Basic Settings Screen 13
Figure 5-9: Wireless Settings Screen 14
Figure 5-10: Security Settings Screen 15
Figure 5-11: WEP Settings Screen 15
Figure 5-12: WPA Personal Settings Screen 16
Figure 5-13: WPA2 Personal Settings Screen 16
Figure 5-14: WPA2 Mixed Mode Settings Screen 17
Figure 5-15: Confirm New Settings Screen 18
Figure 5-16: Congratulations Screen 18
Figure 6-1: Login Screen 21
Figure 6-2: Setup - Automatic Configuration - DHCP Screen 21
Figure 6-3: Setup - Static IP Screen 22
Figure 6-4: Wireless - Basic Wireless Settings Screen 23
Figure 6-5: Wireless - Wireless Security (WPA-Personal) Screen 24
Figure 6-6: Wireless Security - WPA2-Personal Screen 24
Figure 6-7: Wireless Security - WPA2-Mixed Screen 25
Figure 6-8: Wireless Security - WPA-Enterprise Screen 25