


MICROBOARDS TECHNOLOGY, LLC GX Auto Printer
11
Microboards Toolbox
Access the Toolbox by selecting the System Preferences from the Dock. Select
Print & Fax. Highlight the Microboards GX Series icon and click the Utility icon.
The Toolbox pages will appear in the following order.
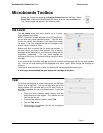
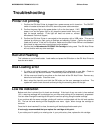
Ink Level
The Ink Levels show how much remains of all 3 colors,
Cyan, Magenta and Yellow.
NOTE: If you place a used cartridge in the GX Auto Printer,
the ink level may not be reported correctly. If the GX Auto
Printer can identify the cartridge, it may report the correct
ink levels; if not, it will assume that the ink cartridge is new
and will show ink levels of 100%.
Before each disc is printed, the ink levels are checked. If
the level of any one color is has reached 10%, a warning
message will be displayed on your Mac and printing will be
temporarily suspended. You can either change the
cartridge at this point, or continue printing using the same
cartridge.
If you continue with the same cartridge, printing will continue uninterrupted until the ink level reaches
5%. The low ink level warning will be displayed once more. Again, either change the cartridge or
continue.
Once the ink level reaches 3% or less, the warning will be displayed before each print.
It is strongly recommended that you replace the cartridge at this point.
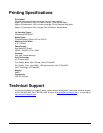
Test
To confirm the computer is communicating with the GX Auto
Printer, print a Test Disc. This can be done with one of the
inkjet printable CD’s included with your GX Auto Printer, or
an inkjet compatible disc you may already have. To print the
Test Disc:
• Place the inkjet printable media directly onto the
belts below the input hopper. The robotics will not
load the disc for you.
• From the Microboards Toolbox, select Test.
• Click the Test button.
• Once printing is complete, the disc will be ejected
into the output hopper.
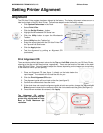
Figure 3