


EN-39
Adjusting projected images (continued)
To adjust the ratio of change in brightness (GAMMA MODE):
You can select a preset gamma mode using the menu.
(See page 29 for menu setting.)
1. Display the IMAGE menu.
2. Select GAMMA MODE by pressing the p or q button.
3. Select your desired gamma mode by pressing the t or u button.
To cancel the menu:
4. Press the MENU button.
To adjust the original ratio of change in brightness (To customize the gamma mode):
To customize (and store) the gamma mode to your preference, carry out the following procedure.
(See page 29 for menu setting.)
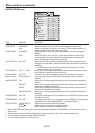
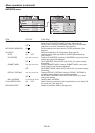
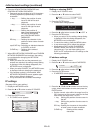
1. Select GAMMA MODE in the IMAGE menu.
2. Press the t or u button to select USER1 or USER2 .
3. Press the ENTER button.
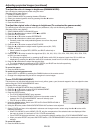
4. Press the p or q button to select REFERENCE.
5. Press the t or u button to select basic gamma curve.
• Generally,selectthemostpreferablegammacurvefromthepreset
gamma curve.
6. Press the p or q button to select ADJUST MODE.
7. Press the t or u button to adjust mode of gamma curve (ALL, RED,
GREEN, or BLUE).
• SelectwhethertoadjustRED,GREEN,andBLUEcollectivelyor
separately.
8. Press the p or qbuttontoselectthesignallevel(2%,4%,6%,10%,15%,20%,25%,30%,40%,50%,70%,
or90%)youwanttoadjust.
• For selecting the signal level, by pressing the qbuttonwhile20%isselected,levelsfrom25%to90%are
displayed;bypressingthepbuttonwhile25%isselected,levelsfrom2%to20%aredisplayed.
9. Press the t or u button to adjust the selected item.
• ThevaluesdisplayedcorrespondtoRED,GREEN,andBLUEfromtheleftrespectively.
10. Repeat steps 6 - 9 for optimum adjustment results.
To cancel the menu:
11. Press the MENU button.
To enable the stored gamma mode:
1. Select USER1 or USER2 by pressing the GAMMA button on the remote control.
• Changeinthebrightnessmaybehardtorecognizeinsomeimages.
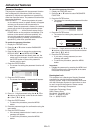
To use COLOR MANAGEMENT:
This projector can individual adjusts each tone in red, yellow, green, cyan, blue and magenta. You can adjust the tone
colors using the COLOR MANAGEMENT menu.
(See page 29 for menu setting.)
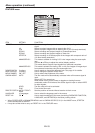
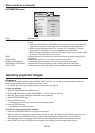
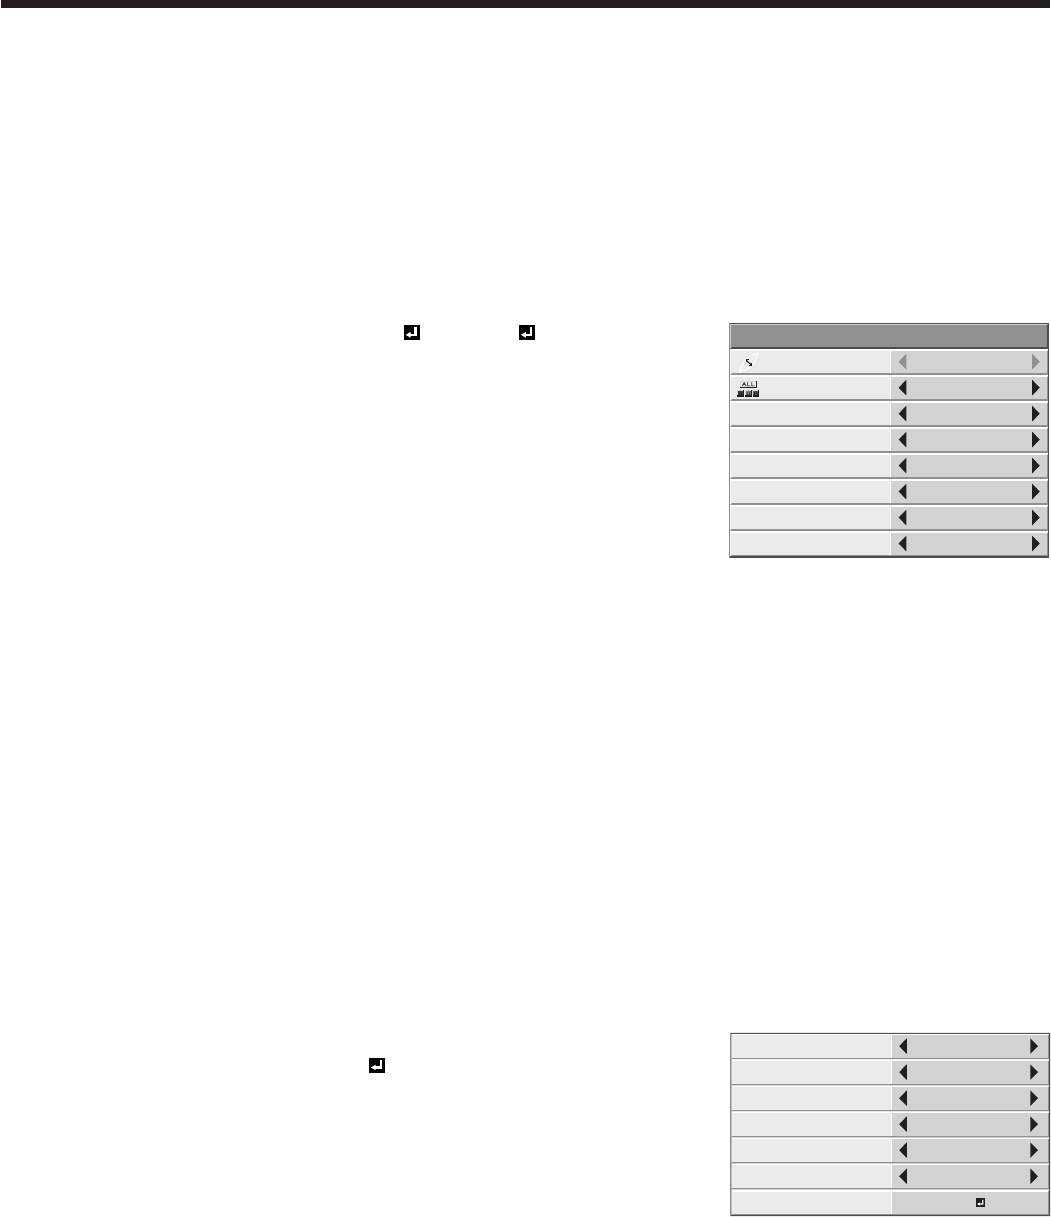
1. Display the ADVANCED MENU from the IMAGE menu.
2. Press the p or q button to select COLOR MANAGEMENT.
3. Press the t or u button to select ON .
4. Press the ENTER button.
• TheCOLORMANAGEMENTmenuappears.
• OncetheCOLORMANAGEMENTbuttonontheremotecontrolis
pressed, this COLOR MANAGEMENT menu will directly open.
• COLORissettoREDbydefault.
5. Using the t or u button, select color REDYELLOWGREENCYAN
BLUEMAGENTARED.
6. Using the q button, select GAINSATURATIONHUE as items to be adjusted.
7. Select COLOR and items to be adjusted in advance and change numeric values using the t or u button while
watching the screen.
• WhenFULL/MONOissettoMONOCOLOR,onlythecomponentsoftheselectedcoloraredisplayed.After
the menu is closed, it is set back to FULL COLOR automatically.
• OncePOSITIONhasbeenselected,youcanchangethedisplaypositionoftheCOLORMANAGEMENTmenu.
• WhenyouselectRESETandpresstheENTERbutton,COLORMANAGEMENTwillberesetbacktothedefault
settings.
To cancel the menu:
8. Press the MENU button.
REFERENCE
GAMMA MODE - USER1
2.0
ALL
ADJUST MODE
0
0
0
0
0
0
0
0
0
0
0
0
0
0
0
0
0
0
2%
4%
6%
10%
15%
20%
COLOR
GAIN
SATURATION
HUE
POSITION
RED
0
0
0
RIGHT UP
FULL/MONO
RESET
FULL COLOR
OK