


EN-34
Expand
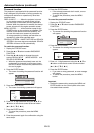
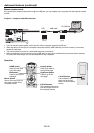
By pressing the EXPAND button on the remote control,
you can magnify the image to view the details.
• The EXPAND mode doesn’t function with some
input signals. For details, see page 45.
• The EXPAND mode doesn’t work with video or
S-video signal.
• When the COMPUTER 1, COMPUTER 2 or DVI-D
(HDCP) button on the remote control or the
COMPUTER button on the control panel is pressed,
the PinP mode will be canceled.
• The PinP mode is available only when the ASPECT
ratio is set to AUTO.
Still
To stop the motion in the image temporarily (or to dis-
play a still image):
Press the STILL button on the remote control.
• The image will freeze temporarily.
To resume the motion in the image:
Press the STILL button on the remote control again.
Important:
• Do not display a still picture for a long time because
the afterimages may persist on the screen. (See
page 42.)
To use the EXPAND mode:
1. Press the EXPAND button.
• You can select the area to be magnifi ed by
pressing the S, T, W, or X button on the remote
control.
• You can change the magnifi cation of the selected
area by pressing the + or - button.
2. Press the EXPAND button again to exit the EXPAND
mode.
• The regular operation screen will appear.
Important:
• In the EXPAND mode, you can’t adjust the volume.
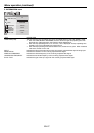
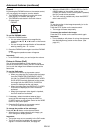
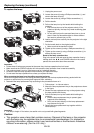
Picture in Picture (PinP)
One of the special features of this projector is the
picture-in-picture (PinP) mode. The PinP mode allows
you to view the images from different sources at the
same time.
To use the PinP mode
1. Press the PinP button on the remote control.
• When you press the PinP button with the image
from the COMPUTER/COMPONENT VIDEO
IN-1/IN-2 or COMPUTER/COMPONENT VIDEO
DVI-D (HDCP) terminal displayed on the screen,
the image from the VIDEO IN or S-VIDEO IN
terminal is displayed as the sub image.
• When the image from the VIDEO IN or S-VIDEO
IN terminal is displayed, the PinP mode isn’t
activated.
• When the component video signal is inputted,
the PinP mode isn’t activated.
2. If necessary, select the desired external input
source of the sub image by using the VIDEO or
S-VIDEO button on the remote control or the VIDEO
button on the control panel.
3. Press the PinP button on the remote control.
• The PinP mode will be canceled.
To change the position of the sub image:
Press the W or X button on the remote control.
• When there is no video signal for sub image, you
can’t change the display position.
Important:
• The motion may not run smoothly in the PinP mode.
• The PinP mode isn’t available with some input
signals. For further information, see page 45.
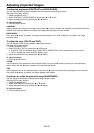
EXPAND
Magnifi ed image
Advanced features (continued)