


EN – 14
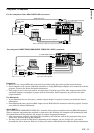
AUDIO 15
To operate projector power ON (Continue)
Turning off the projector
7. Press the POWER button.
The message “POWER OFF? YES : PRESS AGAIN”
appears on the screen.
• To exit this mode, press any button except the POWER
button. (Some buttons on the remote control don’t
work for exit from this mode.)
8. Press the POWER button again.
The light source lamp will go out. Though the light source
lamp will go out at this second press of the POWER but-
ton, the exhaust fan continues to operate for another 120
seconds to cool down the lamp and LCD panel. In this
case, the lamp indicator will go out.
9. Turn off the main power switch, and the POWER indi-
cator will go out.
• In cases where the main power switch is accidentally
turned off when either the intake/exhaust fan or the
power source lamp is in operation, allow the unit to
cool down for 10 minutes with the power turned off.
Repeat step 3 when turning on the power source lamp.
If the lamp does not turn on immediately, repeat this
step two or three times. Replace the lamp if it should
still fail to turn on.
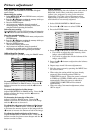
AUTO POSITION button
When the image isn’t projected in the right position with
COMPUTER selected as the image source, follow the
steps below.
1. Project a bright image such as the “Trash” window on
the full screen.
2. When the screen saver is running, turn it off.
3. Press the AUTO POSITION button.
• If the image is still not in the right position, adjust the
image position using the SIGNAL menu.
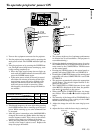
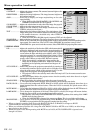
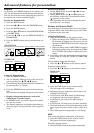
Volume from the speaker
Press the volume + or – buttonto change the volume from
the speaker.
The volume control bar will appear on the screen.
• The volume control bar will disappear about 4 seconds
after releasing the volume buttons.
• The volume buttons don’t work while the MENU
selection bar or the MENU is being displayed.
• When a high-level audio signal, such as a DVD audio
signal, is supplied to the COMPUTER AUDIO IN
terminal, the output from the speaker may be dis-
torted.
AV mute
The image and audio signals are temporarily muted by
pressing the MUTE button. To bring them back to their
normal level, press the MUTE button again.
• The audio from the AUDIO OUT jack is also muted by
pressing the MUTE button.
• If the MUTE MODE in the INSTALLATION menu is
set to LOGO, the splash screen will appear by pressing
the MUTE button.
Please contact your dealer or Mitsubishi sales office for
further information.
• You can alter the splash screen freely. Please contact
your dealer or Mitsubishi sales office for further
information.
• The lamp mode becomes “LOW” during muting.
Therefore, the display of LOGO will darken, which
isn’t a failure.
• Muting will be cancelled in 3 hours automatically for
the purpose of protecting devices. However, when the
mute mode has been set to “LOGO,” muting won’t be
cancelled.
ANAMORPHIC mode
When playing DVD discs containing data of letterboxed
image, press the 16:9 button. Exit the ANAMORPHIC
mode, by pressing the 16:9 button again.
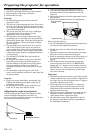
Caution:
• When you have finished using this projector, wait 120
seconds for the exhaust fans to stop. Then turn off the
main switch and unplug the power cord from the wall
outlet, for safety purposes.
• The lamp cannot be turned on again for 60 seconds after
it was turned off for precautionary purposes. It will take
another 60 seconds before the lamp indicator goes off. If
you want to turn on the projector again, wait until the
indicator is off, and then press the POWER button.
• The exhaust fan rotates faster as the temperature around
the projector rises.
• When the temperature around the projector rises too
high, the sign “TEMPERATURE!!” blinks red on the
screen. If the temperature stays too high, the lamp will
be go out automatically.
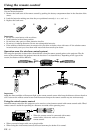
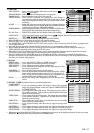
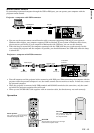
Installation other device’s remote commands
You can install other device’s remote commands in the
remote control of this projector.
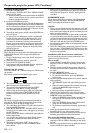
How to install
1. Set the SELECT switch of the remote control of this
projector to DVD or VIDEO, depending on the device
you use.
2. Place the remote control of this projector and that of
the other device with their transmission windows 2-5
cm apart.
3. Press the MEMORY button.
• The MEMORY button will blink red.
• To cancel the installation, press the MEMORY
button again.
4. Press any programmable button on the remote control
of this projector.
• The MEMORY button will stop blinking and stay
on.
• When no button is pressed for 6 seconds after step
3 and 4, the MEMORY button will go out
automatically.
• See page 8 for the programmable buttons.
5. Hold down the button on the other device’s remote
control whose command you want to install until the
MEMORY button start blinking.
• When the MEMORY button blinks six times and
then goes out, the function has been installed
successfully.
• When the MEMORY button doesn’t blink before
going out, the installation has failed.
• To continue to install other functions, repeat step 3
to 5.
• Some special commands are not memorized,
depending on the type of the remote control.
• Do not install any remote commands of other devices
including air conditioners than video devices.
How to use the installed functions
1. Set the SELECT switch of the remote control of this
projector to DVD or VIDEO, depending on the device
you use.
2. Press the programmable button in which the desired
remote command has been installed.