


EN – 20
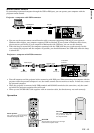
Advanced features for presentation
Expand
By pressing the EXPAND button on the remote con-
trol, you can magnify the detailed image of the picture.
You can also view the screen displaying the picture as
its original size (native resolution display).
Setting the Expand mode
1. Press the MENU button.
2. Press the $ or % to select the FEATURE menu.
3. Press the ENTER button.
4. Press the { or } button to select EXPAND MODE
or FRAME POSI.
5. Press the $ or % to set the EXPAND MODE or
FRAME POSI.
6. Press the MENU button twice to exit the menu sys-
tem.
REAL screen display
• During REAL mode, Press the $ or % buttons
for fine adjustment.
• During REAL mode, the { and } buttons are
not working. At this time, the prohibition mark
( ) appeares on the screen.
• The expanding rate cannot be changed by press-
ing either the + or - button.
Picture in Picture (PinP)
One of the special features of this unit is the picture-
in-picture (PinP) mode. PinP allows you to view differ-
ent sources at the same time.
Using the PinP mode
1. Press the PinP button on the remote control.
• When the image from VIDEO IN or S-VIDEO
IN terminal is displayed on the screen, the im-
age from COMPUTER IN terminal is displayed
as sub-image.
• When the image from COMPUTER IN terminal
is displayed on the screen, the image from VIDEO
IN or S-VIDEO IN terminal is displayed as sub-
image.
2. If necessary, select the desired external input source
of the image by using the VIDEO or COMPUTER
button.
To switch Main image and Sub image
3. Press the { or } buttons on the remote control.
To change frame position
4. Press the $ or % buttons on the remote control.
5. Press the PinP button on the remote control.
The sub image will be disappear.
• Adjusting contrast, brightness, tint or color is not
available in PinP mode.
• In PinP mode, both Main image and Sub image
are displayed with their frames skipped.
• In PinP mode, the audio of the Main image is
outputted.
• In PinP mode, the images may not move smoothly.
• The PinP mode may not function depending on the
input signal. For more details, refer to page 28 or
29.
• The UXGA signal isn’t displayed as a sub image.
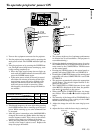
Still
How to stop the picture temporarily (still picture).
1. Press the STILL button on the remote control.
The picture will freeze temporarily.
To resume picture activity.
2. Press the STILL button on the remote control again.
Normal
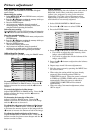
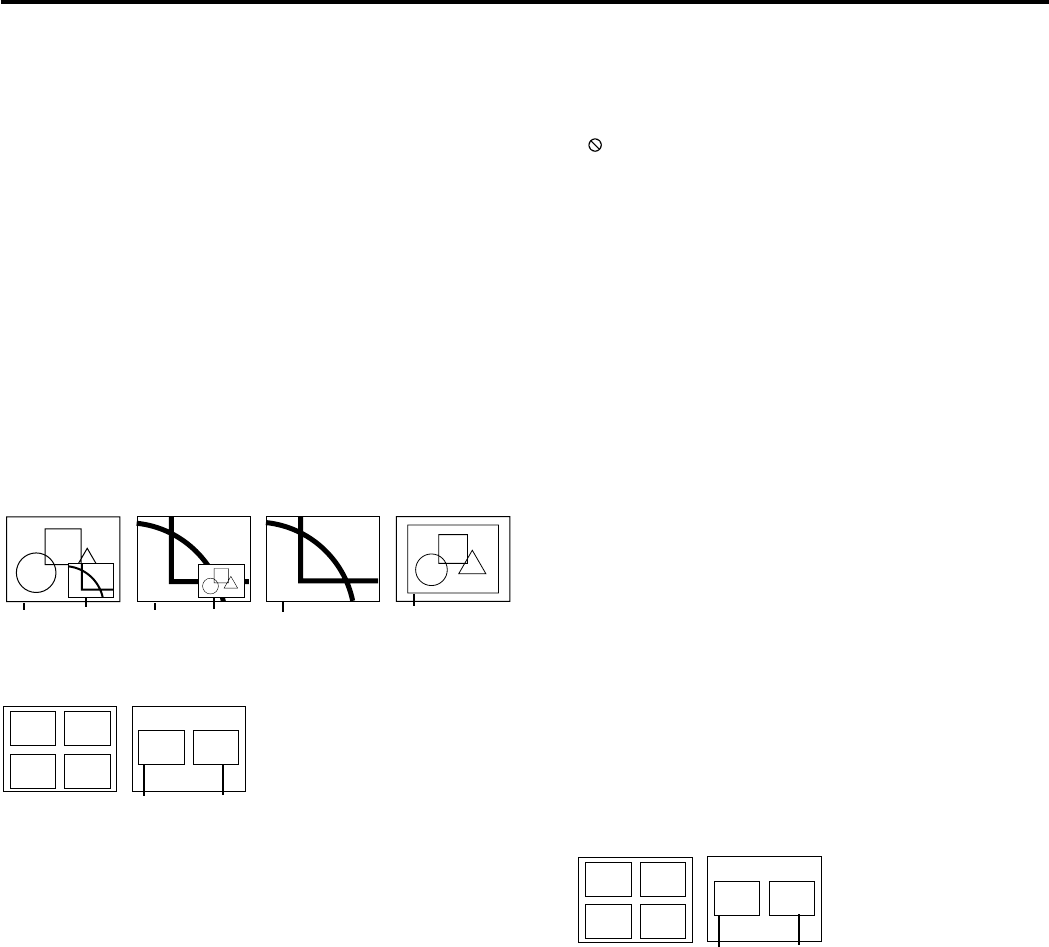
image
Native resolution
display
Zooming
image
(EXPAND MODE 1)
Zooming
image
Normal
image
(EXPAND MODE 2)
Zooming
image
(EXPAND MODE 3) (EXPAND MODE 4)
EXPAND MODE
(FRAME POSI.
1~4)
(FRAME POSI. 5)
12
34
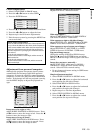
Main
image
Sub
image
FRAME POSI.
Using the Expand mode
1. Press the EXPAND button.
• You can magnify different areas of the active pic-
ture by pressing the {, }, $, % button.
• You can change the magnification of the zoomed area
by pressing the + or - button.
2. Press the EXPAND button twice on the remote con-
trol.
The normal screen display will appear on the screen.
• Display enlargement does not work with
video input or S-video input.
• In EXPAND mode, you cannot adjust the zoom/fo-
cus and the volume.
• The Expand mode may not function depending on
the input signal. For more details, refer to page 28
or 29.
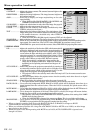
(FRAME POSI.
1~4)
(FRAME POSI. 5)
12
34
Main
image
Sub
image
FRAME POSI.