


Chapter 1 Installing and Configuring the SCXI-119X
© National Instruments Corporation 1-11 SCXI-1190/1191/1192 User Manual
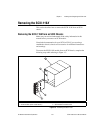
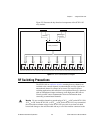
Self-Test Verification
To test thesuccessful configuration of yoursystem, complete the following
steps:
1. Double-click the Measurement & Automation Explorer icon on
your PC desktop.
2. Verify that the chassis power is on and that the chassis is correctly
connected to a DAQ device or computer-based instrument.
3. Expand Devices and Interfaces.
4. From the list of devices and interfaces that appears, locate the chassis
you want to test. Right-click on the chassis and select Test.Ifthe
communication test is successful, a message
The chassis has
been verified
appears.
5. Click OK.
Note
If the communication test is unsuccessful, refer to the Troubleshooting Self-Test
Verification section.
Your SCXI system should now operate properly with your ADE software.
If you experience problems between your SCXI system and your ADE,
refer to the Troubleshooting Self-Test Verification section. Additionally,
you may find it helpful to refer to your NI-SWITCH documentation,
your ADE software documentation, and your chassis documentation.
National Instruments documentation is available to download free at
ni.com/manuals
Troubleshooting Self-Test Verification
If the preceding test did not verify your chassis configuration, take the
following steps to successfully complete system configuration:
• If youget the warningmessage
Unable to test chassis at this
time
, verify that you have designated a module as being connected to
a DAQ device or computer-based instrument. Take the following
troubleshooting actions:
a. Double-click the Measurement & Automation Explorer icon
on your PC desktop.
b. Expand Devices and Interfaces.
c. Expand your SCXI chassis to show all the SCXI modules.
d. Right-click the module that is connected to your DAQ device or
computer-based instrument and select Properties.