Getting Started with R Series Intelligent DAQ 2 ni.com
Refer to the LabVIEW Release Notes for installation instructions for LabVIEW and system requirements
for the LabVIEW software. Refer to the LabVIEW Upgrade Notes for additional information about
upgrading to the most recent version of LabVIEW for Windows.
Refer to the LabVIEW FPGA Module Release and Upgrade Notes for installation instructions and
information on getting started with the LabVIEW FPGA Module.
Refer to the LabVIEW Real-Time Module Release and Upgrade Notes for system requirements,
installation instructions, and additional information on using the LabVIEW Real-Time Module.
The previous documents are available at
ni.com/manuals or by selecting Start»All Programs»
National Instruments»LabVIEW»LabVIEW Manuals.
Step 2. Install the Device, Accessories, and Cables
This section describes how to unpack and install the NI PXI-78xxR and NI PCI-78xxR devices.
Note You must install NI-RIO before installing the NI 78xxR.
Unpacking
The NI 78xxR is shipped in an antistatic package to prevent electrostatic discharge from damaging
device components. To prevent such damage when handling the device, take the following precautions:
• Ground yourself using a grounding strap or by holding a grounded object, such as your computer
chassis.
• Touch the antistatic package to a metal part of the computer chassis before removing the device
from the package.
Caution Never touch the exposed pins of connectors.
Remove the device from the package and inspect the devices for loose components or any other sign of
damage. Notify NI if the device appears damaged in any way. Do not install a damaged device into the
computer.
Store the NI 78xxR in the antistatic envelope when not in use.
NI 78xxR Installation
You can install the NI PCI-78xxR in any available PCI expansion slot in the computer, and the
NI PXI-78xxR in any available peripheral slot in the PXI or CompactPCI chassis. To achieve the best
noise performance, leave as much room as possible between the NI PCI-78xxR and other boards.
Note You must install the software before installing the hardware. For software installation
information, refer to the Step 1. Install Application Software and Driver section.
1. Power off and unplug the computer or PXI chassis.
Caution Refer to the Read Me First: Safety and Radio-Frequency Interference document packaged
with your PXI chassis or device before removing equipment covers or connecting or disconnecting
any signal wires.
2. Remove the computer cover and/or the expansion slot cover on the computer, or the filler panel of
an unused PXI slot on the PXI chassis.
3. Touch any metal part of the computer or chassis to discharge any static electricity.
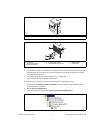
4. For the NI PCI-78xxR, insert the device into the applicable PCI system slot on your computer.
Gently rock the device into place. Do not force the device into place. For the NI PXI-78xxR,
insert the device into the PXI slot. Use the injector/ejector handle to fully inject the NI PXI-78xxR
into place.


