


© National Instruments Corporation 7 Getting Started with R Series Intelligent DAQ
Step 4. Using Your NI 78xxR Device with a LabVIEW FPGA Example VI
(NI 783xR/784xR/785xR Only)
The NI-RIO driver installation includes a variety of example projects to help get you started.
This section demonstrates how to use an existing LabVIEW FPGA example project to take an
analog input measurement with the NI 78xxR device.
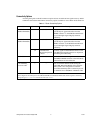
Each R Series example project includes:
• A LabVIEW FPGA VI that can be compiled and run embedded in FPGA hardware
• A Host VI that runs in LabVIEW for Windows and interacts with the LabVIEW FPGA VI
The examples are configured for a specific target and are not necessarily configured for your device.
To use the examples for a different target, you must copy the items contained within the VI to a new
FPGA target.
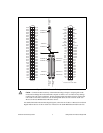
Note To acquire real-world data in the analog input measurement taken in this example,
you will also need to provide your own signal source, such as a battery or function generator.
To access the analog input example project and take a measurement, complete the following steps:
1. Launch LabVIEW.
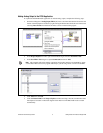
2. In the Getting Started window, click Find Examples to display the NI Example Finder.
3. In the NI Example Finder window, select Hardware Input and Output»R Series. This directory
holds several example projects designed to help you get started using your R Series device.
4. Select Basic I/O and then select Analog Input - R Series.lvproj.
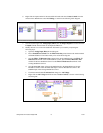
5. The Analog Input example project opens in the Project Explorer window. This project is
precompiled for the NI PCI-7831R. If you are not using an NI PCI-7831R, then you need
to copy the example files into a new target directory and recompile the code. To compile
Analog Input - R Series.lvproj for a new R Series target, complete the following steps:
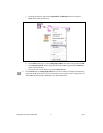
a. Right-click My Computer and select New»Targets and Devices to create a new target
in the Project Explorer window.
b. Select the Existing target or device radio button.
c. Expand the FPGA Target folder to display a list of the R Series devices you can add.
From the list, select the device for which you want to create a new directory, and click OK.
If your R Series device does not appear under this tree structure, refer to the Step 2. Install the
Device, Accessories, and Cables section and confirm that the device was installed correctly.
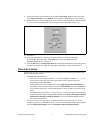
d. In the Project Explorer window, expand the original FPGA target and locate the Items to
Move folder. This folder holds all the target VIs and I/O resources necessary to run the
example VI. Click on the folder and drag it to the new FPGA Target.
Note The new target must support all of the analog input items included in this folder.
e. Right-click the Analog Input (FPGA).vi file within the Items to Move folder and select
Compile to recompile the FPGA VI. Recompiling takes several minutes. When the bitstream
generation is complete, close the LabVIEW FPGA Compile Server.
f. Open Analog Input (Host).vi under My Computer and switch to the block diagram to update
the host VI and its references to the FPGA VI.