


Chapter 2 PCI-MXI-2 Configuration and Installation
© National Instruments Corporation 2-3 PCI-MXI-2 for Linux
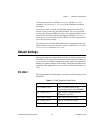
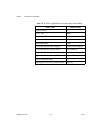
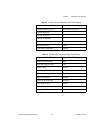
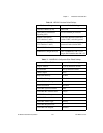
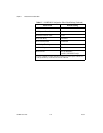
Configuration EEPROM
The PCI-MXI-2 has an onboard EEPROM, which stores default register
values that are loaded at power-on. The EEPROM is divided into two
halves—a factory-configuration half, and a user-configuration half—so
you can modify the user-configurable half, while the factory-configured
half stores a back-up of the default user settings. The factory configuration
is a minimal configuration that allows you to boot your PCI-MXI-2
regardless of the changes made to the user configuration.
For information on configuring the onboard EEPROM, refer to
Appendix C, EEPROM Configuration.
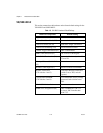
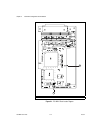
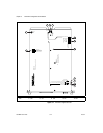
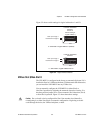
Install the PCI-MXI-2
This section contains general installation instructions for the PCI-MXI-2.
Consult your computer user manual or technical reference manual for
specific instructions and warnings.
1. Plug in your PCI-based computer before installing the PCI-MXI-2.
The power cord grounds the computer and protects it from electrical
damage while you are installing the module.
Caution To protect both yourself and the computer from electrical hazards, the computer
should remain off until you are finished installing the PCI-MXI-2 module.
2. Remove the top cover or access port to the PCI bus.
3. Select any available PCI expansion slot.
4. Touch the metal part of the power supply case inside the computer to
discharge any static electricity that might be on your clothes or body.
5. Line up the PCI-MXI-2 with the MXI-2 connector near the cut-out on
the back panel. Slowly push down on the top of the PCI-MXI-2 until
its card-edge connector is resting on the expansion slot receptacle.
Using slow, evenly distributed pressure, press the PCI-MXI-2 straight
down until it seats in the expansion slot.
6. Check the installation. Ensure that the PCI-MXI-2 is secure in its slot.
7. Replace the computer cover.