


Chapter 3 VXI-MXI-2 Configuration and Installation
PCI-MXI-2 for Linux 3-18 ni.com
You can use 32- or 36-bit SIMMs because DRAM parity is not required.
Because the VXI-MXI-2 supports only one organization at a time, all
SIMMs installed must be of the same type. Use Bank 0 first when installing
the SIMMs. This allows you to install up to 64 MB. The VXI-MXI-2
supports DRAM speeds of 80 ns or faster.
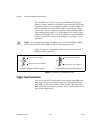
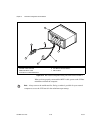
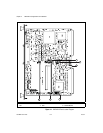
Switch S6 is used to select the size of each SIMM. The SIMM sockets and
S6 are accessible only by removing the right-side cover. To access these
components, remove the four screws on the top, the four screws on the
bottom, and the five screws on the right-side cover of the metal enclosure.
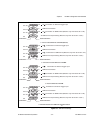
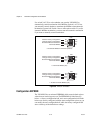
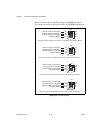
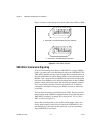
If the SIMMs are 4 M × 32 or larger, S6 should be in the OFF setting as
shown in Figure 3-11a. For SIMMs smaller than 4 M × 32, use the ON
setting as shown in Figure 3-11b.
Figure 3-11. SIMM Size Configuration
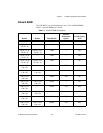
Refer to Table 3-1 for how to adjust the switch (ON or OFF) for all
supported DRAM configurations. Many of the DRAM options are
available from National Instruments.
Install the VXI-MXI-2
This section contains general installation instructions for the VXI-MXI-2.
Refer to your VXIbus mainframe user manual or technical reference
manual for specific instructions and warnings.
1. Plug in your mainframe before installing the VXI-MXI-2. The power
cord grounds the mainframe and protects it from electrical damage
while you are installing the module.
Caution To protect both yourself and the mainframe from electrical hazards, the
mainframe should remain off until you are finished installing the VXI-MXI-2 module.
2. Remove or open any doors or covers blocking access to the
mainframe slots.
b. Smaller than 4 M x 32a. 4 M x 32 and Larger
S6
S6
SIMM Size
(• = 4M x 32
and Larger)
SIMM Size
(• = 4M x 32
and Larger)