


8-43
Replacing PCI Board
Follow the procedure below to replace the failed PCI board.
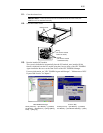
32. Check the PCI board LED and identify the failed PCI board.
When the PCI board is failed or incorrectly installed, the two LEDs associated with the
PCI board slot are being turned off.
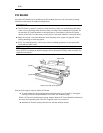
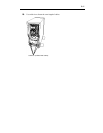
33. Remove the PCI module.
34. Remove the PCI module’s top cover.
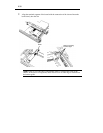
35. Remove the PCI board retainer bracket to dismount the PCI board.
In the case of a long board, unscrew the guide at the other edge and slide it to the front of
the board.
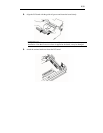
36. Replace the board and fasten it.
37. Install the PCI module’s top cover.
38. Install the PCI module.
Do not close the release lever at this time.
39. Connect the network cable and option cables.
40. Close the release lever.
41. Secure the release lever with the setscrew.
42. Boot the PCI module using the NEC ESMPRO Manager or ft server utility to establish a
dual configuration.
In the initial setting, the server will start up automatically upon mounting the PCI module.
If it is set not to start up automatically, use Data Viewer of NEC ESMPRO Manager or ft
server utility to start it.
For more information, refer to "NEC ESMPRO Agent and Manager" - "Maintenance of
NEC Express5800/ft series" in Chapter 5.
43. Check the PCI module status LED and PCI board status LED.
For description of LED indications, see “LEDs” in Chapter 2 and “Setup of Optional PCI
Board” later in this chapter.