


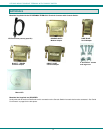


NTI RACK MOUNT CONSOLE TERMINAL WITH CONSOLE SWITCH
7
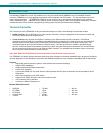
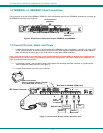
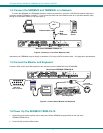
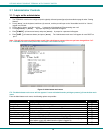
1.4 Connect the SERIMUX and TERMINAL to a Network
To control the SERIMUX and TERMINAL through a network connected PC, connect a CAT5 Ethernet network cable to the
connector marked "TERMINAL-10 BASE T". Then connect the other end of the Ethernet cable to a Local Area Network (LAN)
through a 10/100 BaseT switch or hub (see Figure 4).
Figure 4- Connect to a Local Area Network (LAN)
Alternatively, the TERMINAL may be directly connected to a PC using a CAT5 Crossover cable. See page 69 for specifications.
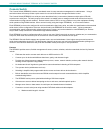
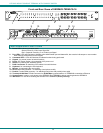
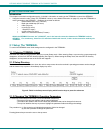
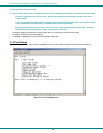
1.5 Connect the Monitor and Keyboard
Connect a VGA monitor and PS/2 keyboard to the connectors marked “MONITOR” and “KEYBOARD”.
Figure 5- Connect User's Monitor and Keyboard
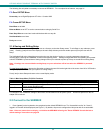
1.6 Power Up The SERIMUX-TERM-CS-16
1. Connect the powercord to a power source and power-ON the SERIMUX using the switch on the rear of the
SERIMUX-TERM-CS-16.
2. Power-ON the connected VGA monitor.
RESET
9101112
131415
123
4
5
6
78
NTI
NETWORK
TECHNOLOGIES
INCORPORATED
Tel: 3 30-562 - 7070
Fax: 330 -562- 1 999
1275 Dan ner Dr
Auro ra, OH 4420 2
www.n etwor ktechin c.com
R
MONIT OR
KEYBOARD
TE RMI NAL-
10 BASE T
ISP
PARALLEL
SERIAL
PRINTER
16
PS/2 Keyboard
VGA
Multi-Scan
Monitor
VGA
Monitor
6 miniDIN
male connector
15HD male
video connector
Rear View of SERIMUX-TERM-CS-16
RJ45
Male
Connector
LAN
Ethernet cable
RESET
9
101112131415 1234
5
6
78
NTI
NETWORK
TECHNOLOGIES
INCORPORATED
Tel: 3 30-562 - 7070
Fax: 330 -562- 1 999
1275 Dan ner Dr
Auro ra, OH 4420 2
www.n etwor ktechin c.com
R
MONIT OR
KEYBOARD
TE RMI NAL-
10 BASE T
ISP
PARALLEL
SERIAL
PRINTER
16
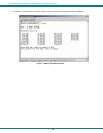
Rear View of SERIMUX-TERM-CS-16
Network
Server
VGA
Multi-Scan
Monitor
Control Terminal