


NTI RACKMUX KVM Drawer with NODEMUX Switch
7
USING THE RACKMUX
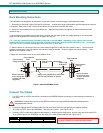
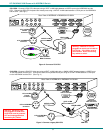
Once the RACKMUX is properly connected, the NODEMUX will enable a connection to be made between the attached CPUs and
the monitor, keyboard, and mouse.
The NODEMUX can be controlled by three methods:
• keyboard control through Command Mode
• mouse clicks from within some menus of Command Mode
• RS232 control from a remote terminal
Keyboard Control
Keyboard control of the NODEMUX is achieved using Command Mode - operated using the keyboard and mouse in
conjunction with OSD menus superimposed onto the monitor.
By pressing <Ctrl> + < ` > (accent key), the user can enter Command Mode. Once in Command Mode, typing a series of
commands will cause the NODEMUX to connect the user to any one CPU connected to the switch. Pressing the <Esc> key will
exit Command Mode. The following instruction describes how to use the menus to operate the NODEMUX Universal KVM switch.
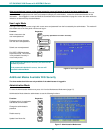
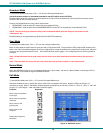
OSD Control
OSD superimposes a menu system on the user’s video screen with a list of all connected CPUs. OSD allows CPUs to be named
(with up to 12-character names). OSD then allows selection of CPUs by that name. Connected CPUs can be listed by name or
by port number. OSD Search Mode enables the user to type in the first few characters of the CPU's name and the OSD will locate
it. Help screens assist with all OSD functions.
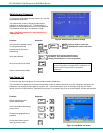
Security Option
The security option of the OSD Control enables an administrator to control access to CPU ports for each user. Up to 63 users
can be created. These users have controlled access to any selected CPU. Only the administrator can activate or deactivate the
security features. Security can be activated from the Maintenance Mode menu (page 15) with a successful administrator login for
verification purposes. Furthermore, the administrator can set a maximum idle time value after which the current user will be
logged out and the login screen displayed. This time out does not function while the OSD is active. The current security status,
idle time out, and scan dwell time are all saved and will be restored whenever power to the switch is cycled OFF, then ON.
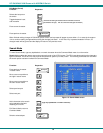
If the security option is enabled, when the RACKMUX is powered up the user will be prompted for a username and password to
continue. If the security option is not enabled the monitor will display the desktop image for the connected CPU and the user can
continue with normal operation of the connected CPU.
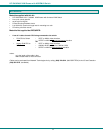
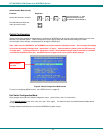
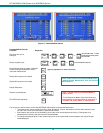
Enabling the Security Feature
To enable the security feature the administrator must first enter Command Mode from the keyboard using the sequence
<Ctrl> + <`> (accent key). The OSD menu will automatically appear on the monitor. This provides a visual way to control the
NODEMUX using the keyboard and mouse.
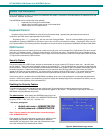
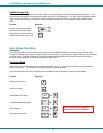
The administrator
, when setting the NODEMUX switch up for the
first time, may want to proceed directly to the ADMINISTRATION Mode
by typing <CTRL> +<M> , then <A>, and then <Y>.
The factory settings are:
• default user name = ADMINISTRATOR
• default password = ADMINISTRATOR
Note: The user name for the administrator cannot be changed
from "ADMINISTRATOR".
Once logged-in, follow the instructions on page 10 for setting up users
and changing the password. Within the Administration Mode the
administrator can setup each of the users and the limitations of their
use of the individual CPUs attached to the switch.
Figure 5- Administrator Login screen