


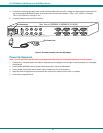

NTI RACKMUX KVM Drawer with NODEMUX Switch
4
INSTALLATION
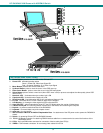
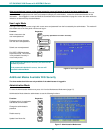
Rack Mounting Instructions
The RACKMUX was designed to be mounted to a rack and includes mounting flanges to make attachment easy.
1. Determine the mounting height in the rack for the drawer. It should be a height comfortable to use the keyboard and see the
LCD display. Mark holes in each of the 4 corner cabinet rails at points all level with each other.
2. Secure the rear brackets to the rear rack cabinet rails. Apply the top screws (not supplied) for each bracket to the holes
marked in step 1.
3. Lift the keyboard into position and line the studs on the left and right sides up with the slotted openings in the rear bracket.
Apply the nuts (supplied) to the studs but do not tighten the nuts yet.
FYI: There are 3 mounting studs provided on each side of the RACKMUX. Depending on the depth of the rack and
distance apart of the cabinet rails, the position of the rear bracket may make all 3 studs available for use. In this case,
apply the 2 nuts to the studs furthest apart from each other on each side.
4. Slide the drawer in until the top holes in the front bracket flanges line up with the holes marked in step 1. Secure the front
brackets on the drawer to the front cabinet rails with two screws per bracket. Be sure to tighten the screws securely. Then
tighten the nuts applied in step 3.
5. Apply one more screw to each of the rear brackets to finish.
Figure 1- Mount RACKMUX to rack
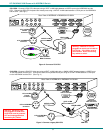
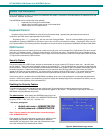
Connect The Cables
1. Turn OFF power to all CPUs that will be connected to the NODEMUX before connecting or disconnecting any cables to or
from them.
WARNING! DAMAGE MAY OCCUR TO THE CPU IF POWER IS NOT DISCONNECTED BEFORE CONNECTING OR
DISCONNECTING CABLES.
2. Connect the appropriate NTI keyboard cable (see the chart below) from the input devices port (keyboard/mouse)
of a CPU to a CPUx port of the NODEMUX. Note the port’s number. (See Figs. 2 and 3.)
3. Connect a VEXT-xx-MM video cable and video adapter, if needed (see the chart below), from the video port of the same CPU
to the VIDEOx port of the NODEMUX with the same port number as the keyboard (see Figs. 2 and 3).
CPU Keyboard Cable Video Cable Video Adapter
PS/2 VKTINT-xx-MM VEXT-xx-MM None needed
SUN SKTINT-xx-MM VEXT-xx-MM 15DM-15HDF
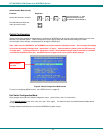
!
NOTE: Make sure the CPU is connected to a CPU x
port and a VIDEO x port with the same number.
Apply nuts (supplied) to studs and
secure rear brackets to drawer.
Front bracket
flange on drawer
Rear bracket
flange
Drawer
Front Cabinet
Rail
Rear Cabinet
Rail
Rear bracket overlapping
drawer
(Rear edge
of drawer)
Stud on drawer
Secure bracket
to rail using two
screws and nut
s
(supplied)
Secure bracket
to rail using two
screws and nuts
(supplied)