


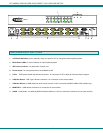


NTI UNIMUX SINGLE-USER HIGH DENSITY VGA USB KVM SWITCH
11
USING THE UNIMUX USB KVM SWITCH
Basic Operation
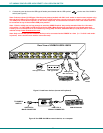
Once the UNIMUX is properly connected, the UNIMUX will enable a connection to be made between the CPUs attached to its
VIDEO and CPU ports and the monitor and input devices attached to the MONITOR and DEVICES ports. The LEDs on the
control panel of the UNIMUX will illuminate depending on which port (and corresponding CPU) is being connected to the monitor
and input devices.
The UNIMUX can be controlled by three methods:
• front panel control using touch-switches and LEDs
• OSD control via the user devices
• RS-232 control (see page 31)
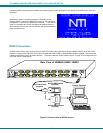
Front Panel Control
There is a touch-switch and LED on the front panel of the UNIMUX for each CPU the switch will connect the monitor and
input devices to. Pressing any touch-switch on the front panel of the UNIMUX will connect the corresponding CPU to the monitor
and input devices.
Holding down any front panel touch-switch for more than 2 seconds will cause the UNIMUX to cycle through all modes of
operation including COMMAND, BROADCAST, SCAN, and NORMAL (described starting on page 17). The three MODE LEDs on
the front panel indicate which mode is selected. Release the touch-switch when the LEDs indicate the desired mode. When no
mode LEDs are illuminated the user is in Normal Mode controlling directly the CPU to which the user is connected through the
UNIMUX.
Keyboard Control
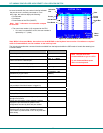
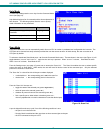
Keyboard control of the UNIMUX can be achieved using OSD Command Mode. Command Mode is operated using the keyboard
and mouse in conjunction with OSD menus superimposed onto the monitor. For all models use the menus as instructed on page
12.
By pressing <Ctrl> + < ` > (accent key), the user can enter Command Mode. Once in Command Mode, typing a series of
commands will cause the UNIMUX to connect the user to any one CPU connected to the switch. Pressing the <Esc> key will exit
Command Mode.