


14 – 3G10WV HSPA Wi-Fi Router with Voice
3.2 TCP/IP Settings
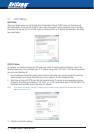
DHCP Mode
When your Router powers up, the Dynamic Host Configuration Protocol (DHCP) server (on the device) will
start automatically. To set your PC for DHCP mode, check the Internet Protocol properties of your Local Area
Connection. You can set your PC to DHCP mode by selecting Obtain an IP address automatically in the dialog
box shown below.
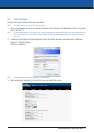
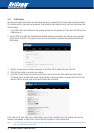
STATIC IP Mode
To configure your Router manually, your PC must have a static IP address within the Router’s subnet. The
following steps show how to configure your PC IP address using subnet 192.168.1.x. The following assumes
you are running Windows XP.
1: From the Network Connections window, open Local Area Connection (You may also access this screen by
double-clicking the Local Area Connection icon on your taskbar). Click the Properties button.
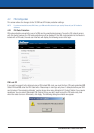
2: Select Internet Protocol (TCP/IP) and click the Properties button. The screen should now display as below.
Change the IP address to the domain of
192.168.1.x
(1<x<254) with subnet mask of 255.255.255.0. Set
the default router and DNS server to the router’s IP address.
NOTE: The IP address of the router is 192.168.1.1 (default), so the PC must be set with a different IP. In the case below, the PC’s IP
address is set as 192.168.1.2
3: Click OK to submit the settings.