


Chapter 3 Installing the shelf, OADM, and OMUX 39
Installation and Networking Guidelines for Optical Routing
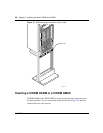
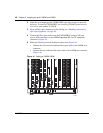
To insert a CWDM OADM or a CWDM OMUX in the optical shelf:
1 Align the plug-in module with the optical shelf.
2 Gently push the plug-in module into the shelf cavity.
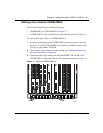
3 Tighten the captive screws.
The module is installed. To cable equipment and network connections, see
“Cabling a CWDM OADM or a CWDM OMUX” on page 39.
Cabling a CWDM OADM or a CWDM OMUX
This section includes the following cabling procedures:
• “Cabling a CWDM OADM” next
• “Cabling a four-channel CWDM OMUX” on page 41
• “Cabling an eight-channel CWDM OMUX” on page 42
Before you attach fiber optic cable to an optical routing device, review the
following:
• “Handling and cleaning fiber optic equipment” on page 49
• Table 1, Parts of the optical routing system
Cabling a CWDM OADM
This section describes how to cable the following:
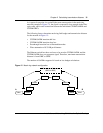
• CWDM GBIC to CWDM OADM (Figure 16)
• CWDM OADM to network backbone interfaces (Figure 16)
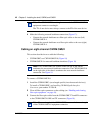
To connect the CWDM OADM plug-in module:
1 Make sure you have the correct CWDM GBIC for your network configuration
by matching the color of the CWDM GBIC label to the color of the connector
label on the OADM (see Table 1 on page 18).