B4400/B4600 User’s Guide – Overlays and Macros (Windows only) > 78
8. Choose Projects→Save Project and enter a meaningful
name (e.g. “Letter Stationery”) so that you can recognise
it.
9. Choose Projects→Send Project Files to Printer to
download the project to the printer.
10. When the message “Command Issued” appears
confirming that the download is complete, click OK to
clear the message.
T
EST
PRINTING
THE
MACRO
1. Choose Printers→Test Macro.
2. In the Test Macro window, enter its ID number and click
OK. After a short pause the printer will print the macro.
3. When each macro has been tested, click Exit.
4. Click the standard Windows Close (X) button, or choose
Projects→Exit to close Storage Device Manager.
D
EFINING
OVERLAYS
This is the final step before the new overlays are ready for use.
1. Open the Printers (called “Printers and Faxes” in
Windows XP) window via the Start menu or the Windows
Control Panel.
2. Right-click on the Relevant PostScript printer icon and
choose Printing Preferences from the pop-up menu.
3. On the Job Options tab, click the Overlay button.
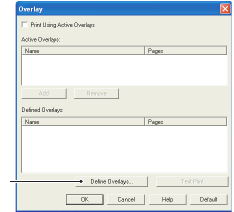
4. In the Overlay window, Click
the Define Overlays
button (1).
1
