


English
34 OKIJET 2500
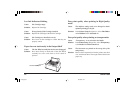
11. Press and release the Cartridge Change/Clean button once
more to return the printhead to its home position.
12. With your computer switched off, complete the connection to
the computer and add paper.
Your printer is now ready for use.
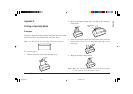
For transportation that involves air travel, or surface travel of more
than one hour, or changes in elevation greater than 1000 feet:
1. With the printer switched on, press and release the Cartridge
Change/Clean button.
2. Open the printer cover and carefully remove all the
ink cartridges, placing them on a paper towel.
Note: Some ink may remain on the exterior surfaces of the ink
cartridges.
3. Wrap the cartridges individually with clear plastic wrap or
similar impervious material.
4. Important! Place all ink cartridges together in a sealed plastic
bag.
5. Remove the colour printhead and install it in the storage box
that came with your printer.
6. Place a moist paper towel in the storage box. Close the lid and
place the storage box in a sealed plastic bag.
7. If you have a monochrome printhead, install it in the printer
then press and release the Cartridge Change/Clean button.
Allow the printer to complete its cleaning cycle, before turning
off.
8. Disconnect all cables from the printer and remove all paper.
The printer, printhead and ink cartridge are now ready for
transportation.
9. As soon as possible after arriving at your destination, re-connect
your printer to AC power and press the Cartridge Change/
Clean button.
10. Remove the colour printhead from the storage box. Discard
the moist towel. If you have a monochrome printhead place it
in the storage box.
11. Carefully unwrap the ink cartridges. If any ink has spilled,
blot it clean.
2500ugb.p65 02/06/98, 11:3334