


Appendix J iPORT (continued)
J-2 iPORT Overview (continued)
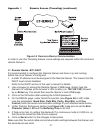
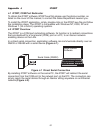
This connection redirection is totally transparent to the serial device and its
application software. Once the connection is up from the PC to the serial device, the
data is transmitted across the Ethernet network to the serial device and back from
the serial device to the PC, all through the iServer and the iPORT.
Figure J-2a Redirect Serial Connection
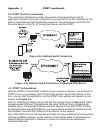
Figure J-2b Redirect Serial Connection - Embedded PCB iServer
J-3 iPORT Configurations
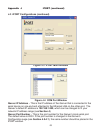
After the iPORT is successfully installed on your windows machine, you will have an
iPORT icon on your desktop and Control Panel window. By double-clicking on this
icon, you can start the application and the iPORT main window will appear on your
screen, see Figure J-3.
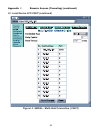
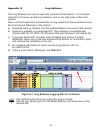
Click on "COM Ports" button and you will see the window shown in Figure J-4. Select
the appropriate COM port (this should be the same COM port that your application
software uses). The selected COM port will then appear on the main iPORT window.
By highlighting the selected COM port, you will be able to add the IP address and the
port number to connect that COM port to the iServer on the network.
Up to 255 COM ports can be selected and each can have a different IP configuration
pointing to different iServers on the network. This enables users to simultaneously
redirect different application software to connect to serial devices attached to
networked iServers.
62