


5
301 Fulling Mill Road, Suite G ©Copyright 2004 by OnQ Technologies, Inc All Rights Reserved.
Middletown, PA 17057 www.onqhome.com
(800)-321-2343
Innovations in Home Living.
IV. Initial Configuration (see Section V Advanced Setup Steps for more information)
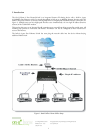
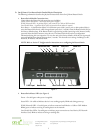
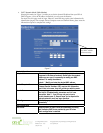
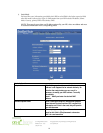
The On-Q Home 4 Port Router/Switch is typically configured in one of two ways; (1) From a portable PC connected
through one of the Local Switch Ports on the Router/Switch Module in the enclosure, or (2) From a PC in one of the
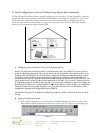
rooms of the house, connected through an outlet in the room to the enclosure where it is patched to (or directly
connected to) one of the Local Switch Ports (see Figure 3). In either case, the PC must have an Ethernet Network
Interface Card to communicate with the Router/Switch.
A. Configuring a Network Interface Card to talk to the Router/Switch
NOTE: The steps below assume that your PC’s network interface card is set to DHCP, or in other words, to
obtain IP addressing automatically. The steps also assume that the On-Q Home 4 Port Router/Switch is set to
its default setting of “Distribute IP” for the local ports and that all the cables previously discussed are properly
connected. It is also possible to perform these steps by configuring your computer (with installed Ethernet
Network Interface Card) to talk to the On-Q Router/Switch on its specific IP subnetwork (192.168.1.xxx). The
On-Q Router/Switch’s default IP address in that subnetwork is 192.168.1.254, so your PC’s Ethernet Card can
be temporarily assigned an IP address, (like 192.168.1.10
), on that same subnetwork to talk to and configure the
Router/Switch. Giving the PC a specific IP address is also called assigning it a Static IP address, as compared to a
Dynamic IP address that is typically assigned by a service provider when your PC’s network interface card is
configured for Dynamic Host Configuration Protocol (DHCP).
NOTE: Before doing any PC IP Address re-configuration, make sure you first write down all of the current IP
settings.
B. Logging on to the Router/Switch
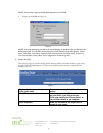
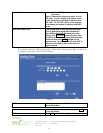
1. With your PC connected to one of the local ports on the Router/Switch, open a browser and enter the
Router/Switch’s default IP address (192.168.1.254), and click “Go” (see Figure 4) to get the login page.
Figure 3
Figure 4