


Manual No. 25-ULPNR101-03; Feb, 2003 LPN5627 / LPR5627 Laser Fixed Mount
Scanner
Page 37
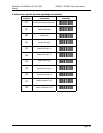
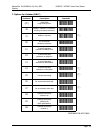
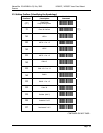
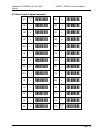
10. Fixing the Number of Digits
Computer
Command
Function
/Description
Bar Code
Command
(Z7)
START/END
Programming Menu
-[8-
7V
Enable fixation
(1
Length)
7W
Enable fixation
(2
Lengths)
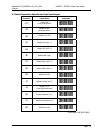
(H0)
Disable fixation
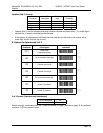
-I1-
%
(H1)
Enable fixation
(1 length)
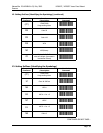
-I2-
(H4)
Enable fixation
(
t
lengths)
-I5-
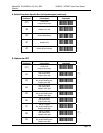
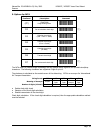
H2
Disable 1 character
Code 39 and Codabar (NW-7);
Disable 2 characters 2 of 5
-I3-
%
H3
Enable 1 character
Code 39 and Codabar (NW-7);
Enable 2 characters 2 of 5
-I!-
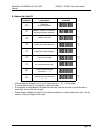
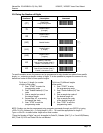
To avoid truncation errors, the scanner can be programmed to only decode bar codes of one specific
length, i.e., containing a specific number of digits. It is also possible to program the scanner to only
decode bar codes of either of two specific lengths.
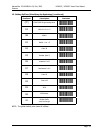
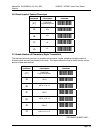
To fix one (1) length (or number
of digits) of bar code:
1. Scan “START” to enter the
programming mode
2. Scan “Enable fixation(H1)” bar
code
3. Scan a sample bar code of
the desired length
4. Repeat Step #3, re-scanning
the sample bar code
5. Scan “STOP” to exit the
programming mode
To fix two (2) different lengths
of bar codes:
1. Scan “START” to enter
the programming mode
2. Scan “Enable fixation(H4)” bar
code
3. Scan a sample bar code of
the desired length #1
4. Scan a sample bar code
of the desired length #2
5. Scan “STOP” to exit the
programming mode
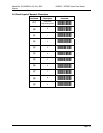
NOTE: Fixation can also be programmed using computer commands through your RS232 by typing
<ESC>7V<CR> followed by <+>2 digit length 1<CR>. 7W would be appropriate for length 2.
Type<+>00<CR> to define either length as no fixed number.
“Fixing the Number of Digits” can only be applied to Code 39, Codabar (NW-7), 2 or 5 and MSI/Plessey.
WPC, Code 93, IATA and Code 128 are not affected.