


7
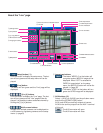
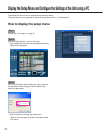
!5 Alarm occurrence indication
button (*2)
This button will be displayed at an alarm occurrence,
and the channel of alarm occurrence (one of [1] to
[4] buttons) will light. When the button is clicked, the
button will disappear and the alarm output connector
will be reset. (☞ page 34)
!6 Mic input button (*3)
Turns on/off the audio reception (hear audio from
the unit on a PC). This button will be displayed only
when "Mic input" or "Interactive" is selected for
"Audio mode" on the setup menu. (☞ page 29)
When this button is clicked, the button will turn into
the button and audio from the unit will not be
heard.
Note:
When this button is clicked, audio from the PC will
be turned off.
When closing the window, click the button again to
turn on the audio.
!7 Audio output button (*3)
Turns on/off the audio transmission (play audio from
the PC on the unit speaker). This button will be dis-
played only when "Audio output" or "Interactive" is
selected for "Audio mode" on the setup menu.
(☞ page 31)
The button blinks while the audio transmission is
being carried out.
When this button is clicked, the button will turn into
the button and audio from the PC will not be
heard.
Notes:
• When a user is using the audio transmission func-
tion, the mic input button and the audio output button
will be inoperable for the other users.
• Possible duration of audio transmission is up to 5
minutes per transmission. When 5 minutes have
passed, the audio transmission function will be can-
celed and the audio reception function will automati-
cally be turned on. To turn the audio transmission
function on, click the audio output button again.
!8 One shot button
Click this button to take a picture (a still picture). The
picture will be displayed on a newly opened window.
The picture will be displayed on a newly opened win-
dow. When right-clicking on the displayed image, the
pop-up menu will be displayed. The displayed image
can be saved on the PC by selecting "Save" from
the pop-up menu.
!9 Time and date
Current time will be displayed in the set date/time
display format (☞ page 18).
@0 Main area (*2)
Images from the camera will be displayed in this
area.
Click a desired point in the main area on the "Live"
page that is to be the centre of the angle of view.
The camera moves to adjust the position in order to
set the clicked point as the centre.
Note:
When using this function, set "PROPO.P/T" of cam-
era to ON. (☞ page 28)
The following cameras are available for the function.
WV-CS950 series, WV-CW960 series, WV-CW970
series (as of January 2007)
*1 Operable by only users and hosts whose access
level is "1. Administrator"
*2 Only operable by users and hosts whose access
level is "1. Administrator" or "2. Camera control"
when "ON" is selected for "User authentication"
(☞ page 37) and "Host authentication" (☞ page 38).
*3 Operable by users and hosts who belong to the
access level selected for "Authentication" on the
[Audio] tab of the "Camera setup" page. (☞ page 30)
Refer to page 37 for further information about the
access level.
Important:
It is impossible to display images and to receive/
transmit audio between the unit and the PC when
the viewer software "Network Camera View3" is not
installed on the PC. (Refer to the operating instruc-
tions for descriptions of how to install.)