


Preparation
10
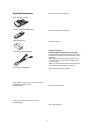
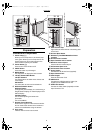
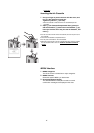
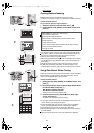
Inserting a Card
ªWhen using an SD Memory Card or a
MultiMediaCard
1
Insert the card all the way into the slot.
≥The Card Access Lamp lights.
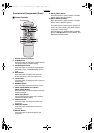
[Removing the Card]
1 Push the card.
2 Remove the card.
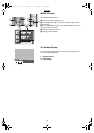
ªWhen Using a PC Card
1
Insert CF Card all the way into 1 (PC Card Adaptor/
Product Sold Separately).
2 Insert 1 into the Photo Printer.
[When Removing the Card Adaptor]
1 Press 2.
2 Remove 1.
≥Never take the card out or turn off the power while the card is being
accessed. This could damage the format of the card and make it
unusable.
≥Insert/remove cards only when the power is off.
≥Card images are formatted as JPEG baselines (JFIF, EXIF, DCF
[Design rule for Camera File system], CIFF, SISRIF) TIFF (Baseline
TIFF Rev.6.0RGB Full Color Images compatible).
The following types of cards can be used:
Compact Flash, IBM Microdrive, Memory Stick and Smart Media.
≥Do not insert/remove the card with the card adaptor inserted.
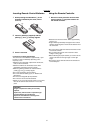
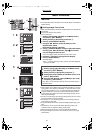
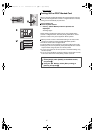
Inserting Paper
1 Open the lid of the paper cassette (included) 1, spread
out
2, and stand up (or push down) 3.
≥When using 4" x 5-7/8" (100 x 148 mm) printing paper or 16 Pre-
Cut Adhesive printing paper, spread
2, and stand up 3.
≥When using 4" x 6" (100 x 150 mm) printing paper, spread
2, and
push down
3.
2 Face the white (print) side of the paper up, and insert
under
4 (5 is the perforation line).
3 While opening the paper cassette door 6 and pushing
the Photo Printer with your hand, insert the paper
cassette all the way into
7.
≥Insert up to 25 sheets of 4" x 5-7/8" (100 x 148 mm) printing paper, or
up to 36 sheets of the other types of paper.
≥Do not pull out the paper cassette during printing.
≥Pull out the paper cassette and close the paper cassette door after
use.
≥Do not fold, bend, or turn paper upside down when inserting into
printer.
≥If you do not insert the paper cassette all the way, when pressing the
[PRINT] button, the error message [There is no paper cassette] will be
displayed on the monitor connected to the unit.