


Connecting and Operating with a personal computer
39
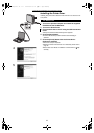
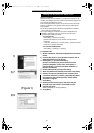
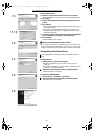
10
Click [Have Disk].
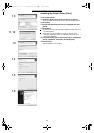
11 Select the folder where the Printer Driver is located.
≥If the CD-ROM drive is the [D: drive], select [D:\Win2K-XP] folder.
12 Click [OK].
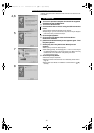
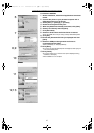
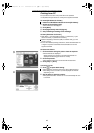
13 Check that [Panasonic SV-AP10] is displayed and click
[Next].
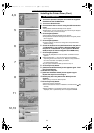
14 Click [Next].
≥If the screen to select the default printer is displayed, select [Yes], if
it is the default printer.
≥If the screen to select the whether the printer is shared or not is
displayed, select [This Printer is not Shared], if the printer is not
shared and click [Next].
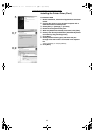
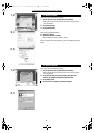
15 If a screen asking you to execute a test print is displayed
during installation, select [No], and click [Next].
16 Click [Finish].
≥The installation is now complete.
ªNotes on Installation of Printer Driver
≥If your system is Windows XP or Windows 2000, log on with the user
name of [Administrator (administrator of your PC)] (or any user name
having an equivalent right to the administrator) and then start to install.
Uninstalling the Printer Driver
Before uninstalling the Printer Driver, disconnect the USB connection
Cable.
For Windows XP
1 Select [Start] >> [Printers and Faxes].
≥[Printers and Faxes] may not be present on some personal
computers.
≥In this case, select [Start] >> [Control Panel] >> [Printers and Other
Hardware] >> [Printers and Faxes].
2 Right-click [Panasonic SV-AP10] and select [Delete].
≥The Printer Driver is uninstalled.
For Windows 98SE/Me/2000
1 Select [Start] >> [Settings] >> [Printers].
2 Right-click [Panasonic SV-AP10] and select [Delete].
≥The Printer Driver is uninstalled.
10
11,12
13
15
14
16
AP10U-Eng.book 39 ページ 2002年9月27日 金曜日 午前10時8分