


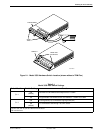

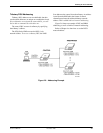

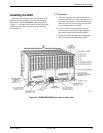

Installing the Model 3550 DSU
2-113550-A2-GB20-20 December 1996
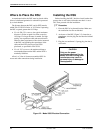
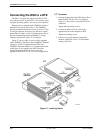
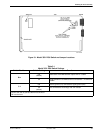
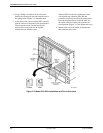
Connecting Port 2
For the EIA-232
cable, install as described above.
For the V.35
cable, install the V
.35 Interconnect Cable,
then the V.35 DTE cable as follows (refer to Figure 2-7).
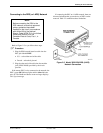
. Procedure
1. Reconfigure the port to match the interface, V.35
in this example.
2. Connect the 25-pin plug end of the V.35
Interconnect Cable (feature number 3000-F1-510)
to Port 2.
T
ighten the holding screws.
3. Connect the plug end of the 34-pin V.35 DTE
cable to the other end of the V.35 Interconnect
Cable.
T
ighten the holding screws.
4. Connect the other end of the DTE cable to the
appropriate port on the computer or DTE.
T
ighten the holding screws.
Refer to Chapter 4 to learn how to reconfigure the
DSU’s port(s).
Verifying Operation and
Testing Connections
Verification testing should be performed after any
installation.
After installing and configuring the circuit (including
control and tributary DSUs, the DDS network, the DBMs
and their dial connections), perform the following series
of tests
fr
om the contr
ol DSU to verify network operation
(using either the DCP or NMS).
Verifying Network Addresses
Access the DSU’s identity (ID) subbranch
for each
tributary DSU
to ensure that the DSUs are properly
addressed. Refer to Chapter 5 for an example using the
DCP, if needed.
. Procedure
1.
Select
Remot (Remote branch).
2. Enter the tributary’
s network address.
3.
Select
Stat (Status branch).
4.
Press the
key until ID appears.
5.
Select
ID.
6.
Press the
key until
Network Addr
appears.
7. Verify that the correct address has been entered.
Repeat this procedure for each tributary DSU in the
network.
Verifying the Network
Perform a Digital Test on the DDS circuit to ensure
that the network is functioning.
. Procedure
1.
Select
Test (F3).
2.
Select
DSU (F1).
3.
Press the
key until DT appears.
4.
Select
DT.
5.
Select
Start (F1).
6. Select a port.
7. Enter the address of the remote DSU.
8. Select the amount of time you want the test to run
in hours: minutes: seconds (hh:mm:ss).
•
Press the
or key to move the blinking
cursor to the digit to be changed.
• Press the F1 (") key to increment the digit
(1 through 9).
• Press the F2 (↓) key to decrement the digit.
9.
Select
Enter (F3).
Please wait
appears as the DSU
starts the test.
10.
When
Command Complete
appears, press the
key
.
11.
Select
Displ (F1) to display the results of the test.
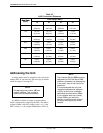
Table 4-6 in Chapter 4 shows the information
received from a Digital Test.
12.
Press the
key to scroll through each result.