2. Basic Configuration
2-6 December 2002 9000-A2-GB31-00
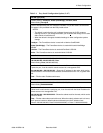
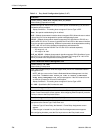
TS Access
Possible Settings: None, DLCI, VPI,VCI, DLCI_on_VPI,VCI
Default Setting: [Depends on model]
Specifies the type of Virtual Circuit (VC) by which special troubleshooting (TS) access is
provided to service providers.
Display Conditions – This setting does not appear if Service Type is PPP.
None – No special troubleshooting link is defined.
DLCI – (Models whose network interface does not support ATM.) Allows the user to select
a frame relay DLCI to be designated for special troubleshooting access.
VPI,VCI – (Models whose network interface supports ATM.) Specifies an ATM VC on a
specific ATM VPI,VCI for TS access. It specifies the VPI and VCI on the network interface
for service provider troubleshooting. ATM data is presumed to be encapsulated according
to RFC 1483. VPI 0,VCI 35 is the default management path between the
FrameSaver device and the DSLAM. The VPI and VCI are entered separately.
– VPI range is 0–15.
– VCI range is 32–255.
DLCI_on_VPI,VCI – (Models whose network interface supports ATM.) Specifies a frame
relay DLCI VC on a specific ATM VPI,VCI for TS access. DLCI range is 16–1007. ATM
data is presumed to be encapsulated according to RFC 1490.
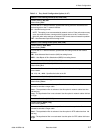
Create a Dedicated Network Management Link
Possible Settings: 16 –1007
Default Setting: Initially blank
Enter a DLCI number and (for units that support ATM) VPI,VCI for a dedicated network
management PVC.
NOTE: With the cursor on the Create a Dedicated Network Management Link field,
press Enter. The Which DLCI would you like to Create a Dedicated
Frame Relay Management PVC on? prompt appears. If the DLCI entered is over
an ATM link, prompts for VPI and VCI also appear.
Display Conditions – This setting does not appear if Service Type is PPP.
16 –1007 – Specifies the DLCI number be used.
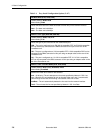
Ethernet Management Options Screen
For units with an Ethernet port, provides a link to the Ethernet Management Options
Screen. Press Enter and the screen appears. After configuring Ethernet options, press the
Esc key to return to the Easy Install screen.
Time Slot Assignment Screen (9123, 9126, 9128)
For units with a T1 network interface, provides a link to the timeslot assignment screen
appropriate to the Service Type. Press Enter and:
If Service Type is Frame Relay, the Network 1 Frame Relay Assignments screen
appears.
If Service type is Leased Line, the Sync Data Port Assignments screen appears.
After configuring timeslots, press the Esc key to return to the Easy Install screen.
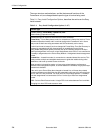
Table 2-1. Easy Install Configuration Options (3 of 7)


