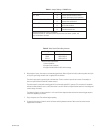
10 C841M-A (7/02)
DWELL TIME
The time between switching from one camera to another is known as the dwell time. The dwell time can be set differently for
each camera or it can be set the same (global) for all cameras on a monitor.
To check the dwell time:
1. Select a camera by pressing the button for that camera.
2. Press the camera button again. A number appears on the monitor indicating the dwell time from 1 to 60 seconds.
To set the dwell time:
1. Press the MON 1 button.
2. Global Dwell Setting - Press and hold the GLOBAL button. Proceed to step 3. Individual Dwell Settings - Press and hold
the desired CAMERA button. Proceed to step 3.
3. Press and hold the TIME button. The timer displays a count in the lower left corner of the monitor, beginning at 1. The
timer counts to 60. Each number represents the dwell time from a minimum of 1 second to a maximum of 60 seconds.
4. Release the TIME button at the dwell time you desire. The count does not wrap around, so if you miss your desired count,
just release the TIME button, then press the TIME button again to restart the count.
5. Release the GLOBAL/CAMERA button.
6. Verify the dwell setting by pressing the camera button of whichever camera is currently selected. The dwell time appears
on the monitor.
7. Repeat steps 2-6 for each camera for individual dwell times.
8. Press the MON 2 button if you have a second monitor and repeat steps 2-7. Both monitors can have different global
dwell times.
CAMERA TITLING
You can program titles for each camera. The titles appear on the monitor screen.
To program or change camera titles:
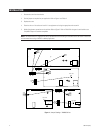
1. Press the MON 1 or MON 2 button for the monitor on which camera titles appear. Camera titles appear on one monitor
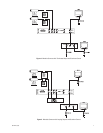
only. The monitor on which the titles appear is determined by the position of jumpers inside the switcher. Refer to
Figure 1 and Table A.
2. Press and hold the GLOBAL button and camera button. A blinking cursor in the camera title indicates that you are in the
edit mode for camera titling.
3. Release the GLOBAL and camera buttons.
4. Enter the camera title. Up to twenty characters can be entered. The blinking cursor indicates its current position. Press
the TIME button to scroll forward through the character set. Press the GLOBAL button to scroll backward through the
character set. Press the SEQ button to move the cursor one space to the right. Press the BYPASS button to move the
cursor one space to the left.
5. When you have finished entering the camera title, do one of the following:
a. Press the camera button to select another camera. The camera title is saved and you are ready to edit the title of
the camera you just selected.
b. Press the button of the camera that is currently selected. The camera title is saved and you exit the camera’s
programming mode.