


54
SunTouch Pool and Spa Control System Installation and User’s Guide
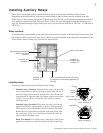
Installing relays (Continued)
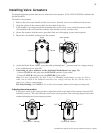
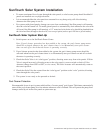
Standard relay (Location 3): Position the relay (coil facing upward) on top of the mounting studs.
Align the relay flanges with the screw holes. Using a 1/4 in nut driver, secure the relay in place with
the two retaining screw.
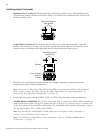
2-Speed Relay (location 3): Position the relay bracket on top of the mounting studs. Align the
bracket with screw holes. Using a 1/4 nut driver, secure the bracket with the two retaining screws.
Insert the relay (coil facing to the right-side) into the relay bracket and snap in place.
2. Route the relay cable into the slot between the low voltage compartment and the transformer
compartment to the SunTouch motherboard.
Note: If there is an Emergency Shut-Off Switch (ESO) circuit board installed in the SunTouch
Power Center, connect the relay wires to the ESO circuit board. For more information, see
“Emergency Shut-Off Switch Installation,” on page 73.
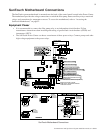
3. Connect the relay plugs onto the PUMP, AUX 1 or AUX 2 two-pin socket on the motherboard.
2-SPEED RELAY CONNECTION
: The 2-Speed relay cable plug is connected to AUX 3 which controls the
pump’s high speed output. The AUX 3 output can only be used for a 2-Speed relay or to control one
of the four speeds for an IntelliFlo 4x160 pump. For installation and operation information, refer to
the Two-Speed Relay User’s Guide (P/N 520210).
Note: The IntelliChlor and IntelliFlo 4x160 pump does not require a relay connection, it
connects to the COM Port (J11) connector.
Note: For SunTouch motherboard wiring connections, refer to “SunTouch Motherboard
Connections,” on page 51.
Mounting studs for
relay screws
Bracket
Insert 2-Speed
relay into
bracket
Mounting studs for
relay screws