


Getting Started
ENGLISH - 18
Connections
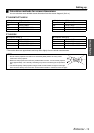
Read and follow the operating and connecting instructions of each peripheral device.
The peripheral devices must be turned off.
Use cables that match each peripheral device to be connected.
If the input signal is affected by signal jitter, the projected image may have poor image quality and timebase
correction is effective.
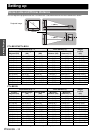
Confirm the type of video signals. See “List of compatible signals” on page 44.
Only one audio system circuit is available for each of the COMPUTER AUDIO IN and AUDIO IN L-R
connectors, so if you change the audio input source, you will need to remove and insert the appropriate
plugs.
If the signal cables are disconnected or if the power supply for the computer or video deck is turned off while
“DIGITAL ZOOM” or “INDEX-WINDOW” is being used, these functions will be canceled.
See “Enlarging the centered area” on page 26.
See “Projecting an image in INDEX-WINDOW mode” on page 25.
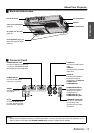
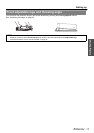
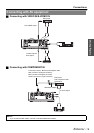
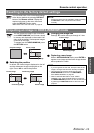
Before connection to the projector
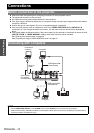
Connecting with computers
NOTE:
• When COMPUTER2 SELECT in the OPTION menu is set to OUTPUT, do not connect any input signals.
• Refer to the accessory CD-ROM for details on the wireless network that can be used for controlling the projector with a
personal computer. (PT-LB51NTU only)
Computers
DIN 8-pin
(male)
Computer for
controlling
RGB signal cable
(Commercial)
RGB signal cable
(Commercial)
Computers
Serial adapter
(ET-ADSER :
sold separately)
Monitor
Audio system